

qtimlpostprocess modules do not support your model’s output format.
Use this workflow when your model can run with an existing QIM SDK inference plugin, but its output tensors require custom processing before they can be converted into labels, bounding boxes, masks, keypoints, raw tensors, or other application-specific metadata. This guide uses a YOLOv8-based object detection model as an end-to-end example to demonstrate each step of the integration process.
Before you begin
Before creating a custom post-processing module, verify the following prerequisites. A custom implementation is only necessary when none of the built-in qtimlpostprocess modules can process your model’s output format.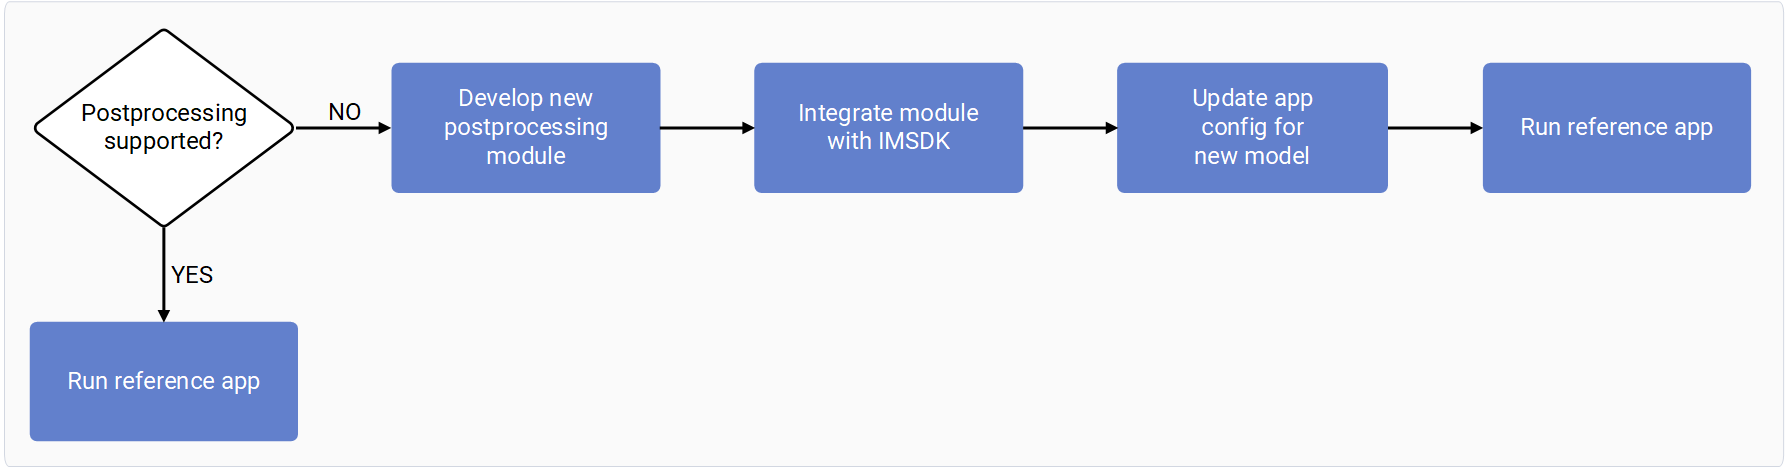
AI pipeline overview
The Qualcomm Intelligent Multimedia SDK (QIM SDK) provides the building blocks to construct AI, multimedia, and computer vision pipelines. An AI workflow is built from three key GStreamer stages, and a custom post-processing module extends only the third stage.- Attach it to the source stream using
qtimetamuxer. - Stream it directly to endpoints such as RTSP, RTMP, or Redis.
- Convert it to an image mask that is overlaid on the source video frame using
qtivcomposer.

qtimlpostprocess plugin handles batching, output-format negotiation, and result limiting around your module.Example: Use ML metadata directly
In this example, the source stream is not propagated after the inference plugin — the metadata is consumed directly.
Example: Attach ML metadata to the source video
In this example, the ML metadata is attached to the source video. An overlay uses the attached metadata to draw bounding boxes, text, and other visual elements. The result is either displayed on screen or streamed over a network.
Example: Convert ML metadata to an image mask
In this example, the ML metadata is converted into an image mask and then blitted on top of the source stream.
qtimlpostprocess plugin behavior
qtimlpostprocess is a customizable plugin that provides a library interface for post-processing the tensor output of inference plugins. The post-processing module is responsible for tensor parsing and produces a list of predictions.
Each post-processing module handles one type of ML model and its variants — for example, all YOLOv8 detection variants. The plugin manages module execution, output generation (ML metadata, image masks, or tensors), batching, ML staging, and related tasks.
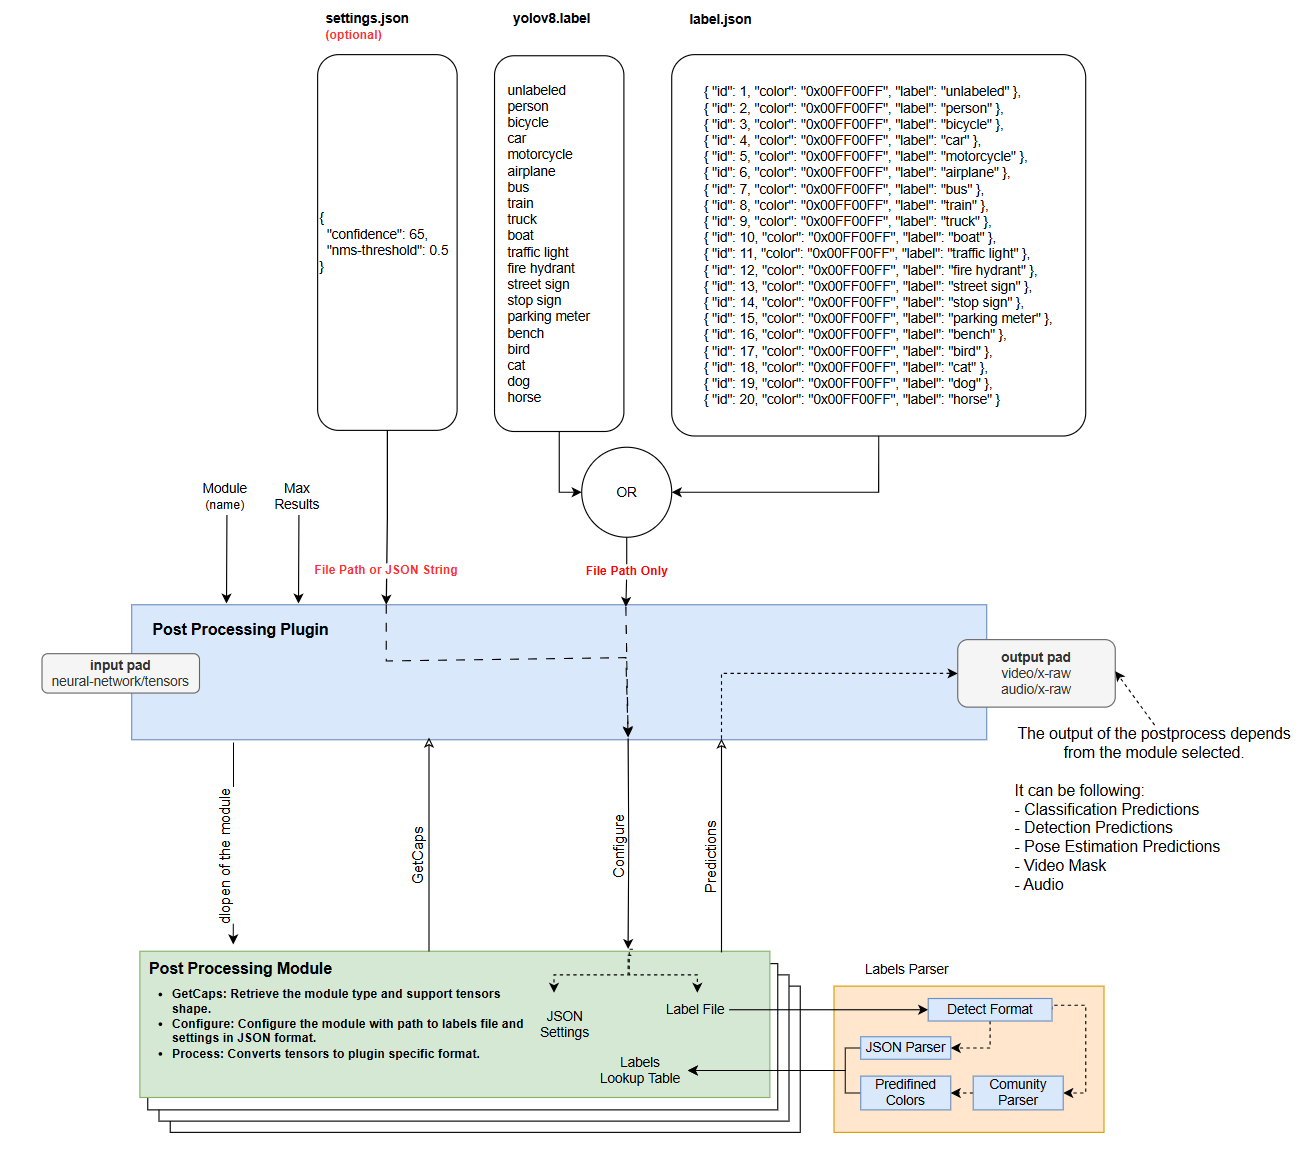
Plugin properties
Output formats
The output format is negotiated through the GStreamer pipeline. The most suitable format is negotiated automatically, but you can specify it manually with a GStreamer caps filter. The plugin supports a single source pad, so if the application needs more than one output format simultaneously, add anotherqtimlpostprocess instance in the pipeline.
- Object detection
- Image classification
- Image segmentation
- Super resolution
- Pose estimation
- Audio classification
Write a post-processing module
A post-processing module is a shared library that parses the tensor output from inference plugins. Theqtimlpostprocess plugin loads and runs the module at runtime. QIM SDK provides a wide variety of out-of-the-box modules.
gst-inspect-1.0 qtimlpostprocess on the target device to see the full list of supported modules and their supported tensor shapes. The following example shows a portion of the output.
/usr/lib/imsdk/qtimlpostprocess/modules/ on the device, and the plugin detects it automatically so it can be selected in the pipeline.
Module and library naming
To avoid name collisions, module shared libraries must follow thelibml-postprocess-<module-name>.so naming convention. The <module-name> must match the value passed to the qtimlpostprocess module property. For example, a YOLOv8 module is named libml-postprocess-yolov8.so and selected with module=yolov8.
Implement the post-processing module interface
Post-processing modules expose a C++ API. Because C++ APIs cannot be loaded directly from shared libraries, class instantiation is encapsulated in a C function that the header file already implements — you do not need to handle instantiation yourself. Implement the following methods in your module class, which derives from theIModule interface.
Define module capabilities with Caps()
Caps() returns the module type and supported tensor shapes as a JSON string. Tensor dimensions can be fixed or defined within a range using square brackets. For example, [1, [21, 42840], 4] indicates the second dimension can vary between 21 and 42840.
The following example declares object-detection post-processing, FLOAT32 tensor format, and support for one, two, or three tensor outputs.
"format": ["FLOAT32", "INT8"].
Configure module settings with Configure()
Parse tensors with Process()
Understanding post-processing module input
Post-processing module input is split into two fields.tensors holds the inference output tensors and describes their structure. Each output tensor is one entry in the vector. For example, YOLOv8 produces three output tensors (boxes, scores, class indices).
- Type:
float,uint8, and so on. - Name: Tensor name, used for identification when two or more output tensors have the same shape. Names are unique and guarantee the exact tensor is selected.
- Dimensions: The tensor shape. For example, YOLOv8 with three output tensors:
[1,8400,4],[1,8400],[1,8400]. - Data: Pointer to the tensor.
mlparams provides additional parameters for tensor processing that may not apply to all modules. It describes how the pipeline processes the input stream, which helps when the stream resolution and aspect ratio do not match the input tensor shape. It is a dictionary implemented with std::any, so you must know the expected key and its return type.
-
Key:
"input-tensor-region"
Type:video::Region
Description: Indicates which portion of the input tensor is filled with actual data from the stream. The remaining area is considered padding. -
Key:
"input-tensor-dimensions"
Type:video::Resolution
Description: Specifies the size of the input tensor. Required to convert absolute coordinates to relative coordinates when the algorithm produces absolute coordinates, since modules must output relative coordinates.
Generating post-processing module output
The output is an array of arrays of results. Arrays are nested to support batching; only the inner array is filled when there is no batching, and its size matches the number of results found. Results are always in relative dimensions, and the result type depends on the module type.-
Image/audio classification
- Name: Predicted category or class.
- Confidence: Class probability or confidence score.
- Color: RGBA8888 color for visualization in the overlay plugin.
- Xtraparams: (optional) Extra key/value pairs to export arbitrary results downstream.
-
Object detection
- Left, top, right, bottom: Bounding box coordinates.
- Name: Predicted category or class.
- Landmarks: (optional) List of keypoints; for example, face detection models can output face points with bounding boxes.
- Confidence: Class probability or confidence score.
- Color: RGBA8888 color for visualization in the overlay plugin.
- Xtraparams: (optional) Extra key/value pairs to export arbitrary results downstream.
-
Pose estimation
- Name: Predicted category or class.
- Confidence: Class probability or confidence score.
- Keypoints: Vector of keypoints.
- Links: (optional) Vector of links between keypoints.
- Color: RGBA8888 color for visualization in the overlay plugin.
- Xtraparams: (optional) Extra key/value pairs to export arbitrary results downstream.
-
Image segmentation and super resolution
- Output is an image frame or mask.
-
Tensor
- List of tensors.
Batching
The plugin automatically splits tensor batches into single tensors, so you do not need to handle batching in the module. For example, if the batch size is four, the module is automatically called four times per batch.Module helper tools
Label and JSON parsers are included in the interface header files. You do not have to use them, but they are provided for convenience. You can use any parser, but the module must be statically linked with it.-
Label parser: Takes the path to a labels file and automatically detects the format.
- New-line-separated format: the line number is the class ID.
- JSON format: set the class index, label, and visualization color. This format is more flexible because you can pass a subset of classes and the rest are automatically filtered out.
- JSON parser: Parses settings passed as a JSON string. It is also used by the Qualcomm-provided label parser for JSON-formatted labels.
Logging
The module can output logs to the GStreamer log system without a direct dependency on GStreamer. The constructor passes a logging object to the module, which you use with theLOG macro. Supported log levels are Error, Warning, Info, Debug, Trace, and Log.
Compile the post-processing module on a host computer
Prerequisites- Ubuntu 22.04 or Ubuntu 24.04 host computer.
Install the required tools
Download the necessary .h and .cc files
Put the IM SDK headers and module source files in one folder
Create a CMakeLists.txt file
Create a toolchain file
aarch64-toolchain.cmake:Configure and build the module
Deploy and test the post-processing module
Set the user environment variable on the host computer
Deploy the module to the target device
Transfer the module to the target device
SSH into the target device
Enter the password when prompted
oelinux123.Remount / with write permissions
Copy the module to the GStreamer plugins directory
Run GST inspect on the target device
Download the models, labels, and media to run the GStreamer pipeline
Create the artifacts dir
Download the label file
yolox.json, then copy it to the target device.Download media file
video1.mp4, then copy it to the target device.Download the model file
yolox_quantized.tflite, then copy it to the target device.Build and run a GStreamer pipeline
module property of qtimlpostprocess, passing a label file and settings if required.In the following example pipeline to run a YOLO-X model:- The pipeline uses an offline video as the source.
- The video is decoded to YUV format using the
v4l2h264decdecoder. - The
qtimlvconverterplugin preprocesses the YUV frames. - The
qtimltfliteplugin runs inference with the LiteRT YOLO-X model. - The post-processing plugin loads the YOLO-X module and passes a JSON label file.
- The pipeline displays the results on Wayland.
Dragonwing™ IQ-615 and Dragonwing™ IQ-2390, change backend_type to dsp as hexagon v66 architecture doesn’t support htp backend_type.Troubleshooting
The module does not appear in gst-inspect-1.0 qtimlpostprocess
The module does not appear in gst-inspect-1.0 qtimlpostprocess
- The library filename follows the
libml-postprocess-<module-name>.soconvention exactly. - The library was copied to
/usr/lib/imsdk/qtimlpostprocess/modules/on the device. - The library was built for
aarch64, using the toolchain file rather than the host compiler. - The module exports the C-compatible entry point, so the shared library can be loaded at runtime.
The pipeline fails to negotiate or the module is never called
The pipeline fails to negotiate or the module is never called
Caps() declaration must match the tensors the model actually produces. Compare the module type, tensor formats, and dimensions returned by Caps() with the output tensors reported for your model, and widen a dimension to a range only where it genuinely varies.Also confirm the module property value matches the <module-name> in the library filename.Results appear in the wrong position on the frame
Results appear in the wrong position on the frame
input-tensor-dimensions, and account for padding using input-tensor-region — the stream is often letter-boxed into the input tensor when the aspect ratios differ.No results are produced at all
No results are produced at all
settings threshold is not filtering everything out, and that results is not set lower than intended. Use the LOG macro inside Process() to confirm the module is being called and to inspect the values it computes.Next steps
Your model is now onboarded: the module parses its output, and the pipeline produces usable metadata. This is the same state reached by a model whose post-processing was already supported, so both routes continue to the same final step.Step 4 · Build the application with custom AI model integration
Related information
qtimlpostprocessplugin reference — complete property, signal, and interface reference.- Troubleshooting — general debugging guidance for AI pipelines.