> ## Documentation Index
> Fetch the complete documentation index at: https://dragonwingdocs-staging.qualcomm.com/llms.txt
> Use this file to discover all available pages before exploring further.
# 故障排除
## 登录问题
要访问 Qualcomm Software Center(网页[门户](https://softwarecenter.qualcomm.com/)和桌面应用程序),您需要
Qualcomm ID。请在 [https://myaccount.qualcomm.com/signup.](https://myaccount.qualcomm.com/signup.) 注册。
如果使用正确的 Qualcomm ID 凭据登录 Qualcomm
Software Center 桌面应用程序时遇到问题,请查看防火墙要求,
以确保您的网络与 Qualcomm 服务器之间的连接功能正常。
## 防火墙要求
QSC 服务器需要访问以下 URL:
* [https://apigwx-aws.qualcomm.com](https://apigwx-aws.qualcomm.com)(端口 443)
* [https://d1fmewm8udj8en.cloudfront.net](https://d1fmewm8udj8en.cloudfront.net)(端口 443)
* [https://dvbe2v39djgxg.cloudfront.net/](https://dvbe2v39djgxg.cloudfront.net/)(端口 443)
* [https://d1k9x1hli7v4r5.cloudfront.net/](https://d1k9x1hli7v4r5.cloudfront.net/)(端口 443)
* (可选,推荐位于中国的用户使用)[https://qpm.chinacloudfront.qualcomm.com](https://qpm.chinacloudfront.qualcomm.com)(端口 443)
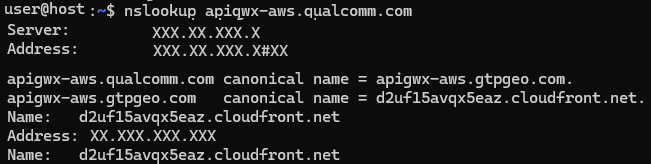
运行以下命令检查 DNS 和防火墙问题。
1. 确认客户端可以通过 DNS 解析 API 端点。
.. container:: nohighlight
nslookup apigwx-aws.qualcomm.com
**示例输出**
 1. 检查连接。
.. container:: nohighlight
1. 检查连接。
.. container:: nohighlight
curl -v [https://apigwx-aws.qualcomm.com](https://apigwx-aws.qualcomm.com)
**示例输出**
.. container:: nohighlight
Rebuilt URL to: [https://apigwx-aws.qualcomm.com/](https://apigwx-aws.qualcomm.com/)
timeout on name lookup is not supported
Trying x.x.x.x...
TCP\_NODELAY set
Connected to apigwx-aws.qualcomm.com (x.x.x.x) port
443 (#0)
schannel: SSL/TLS connection with
apigwx-aws.qualcomm.com port 443 (step 1/3)
schannel: checking server certificate revocation
...
schannel: SSL/TLS handshake complete
schannel: SSL/TLS connection with
apigwx-aws.qualcomm.com port 443 (step 3/3)
schannel: stored credential handle in session cache
GET / HTTP/1.1
Connection #0 to host apigwx-aws.qualcomm.com left intact
### Linux 客户端故障排除
请按以下顺序测试这些步骤。如果某一步成功完成,请继续下一项测试。
1. 确认客户端可以通过 DNS 解析 API 端点。
* 在 Linux 终端中输入 `nslookup` 并按 **Enter**。
* 输入 API 端点 `apigwx-aws.qualcomm.com` 并按 **Enter**。
预期响应是类似下图的 IP 列表。
.. figure:: ../images/nslookup\_linux.png
:alt: nslookup
:scale: 60
如果未返回任何 IP,请联系贵公司的 DNS 团队,排查客户端无法解析 `apigwx-aws.qualcomm.com`
或客户端 DNS 的问题。
2. 确认客户端可以通过 Ping 访问 API 端点。
* 在 Linux 终端中输入 `ping apigwx-aws.qualcomm.com`。
* 五到十秒后按 Ctrl + C 停止 ping 测试。
下图显示了零丢包的响应。
 如果出现丢包或未收到数据包,请联系您的网络团队,通过 Ping 排查 `apigwx-aws.qualcomm.com` 的问题。
3. 确认客户端可以通过 Telnet 访问 API 端点。
* 在 Linux 终端中输入 `telnet apigwx-aws.qualcomm.com 443`。
预期显示 `Connected to *****.cloudfront.net` 消息。
* 按 Ctrl + C 关闭连接。
如果出现 `connection failed` 或 `timed out` 消息,请联系您的网络团队,
从您的客户端通过 Telnet 排查 `apigwx-aws.qualcomm.com` 的问题。
### Windows 客户端故障排除
请按顺序测试这些步骤。如果某一步成功完成,请继续下一项测试。
1. 确认客户端可以通过 DNS 解析 API 端点
* 打开 Windows 命令提示符。
* 输入 `nslookup` 并按 **Enter**。
* 输入 API 端点 \ [apigwx-aws.qualcomm.com](http://apigwx-aws.qualcomm.com/)\ ,然后按 Enter。
预期响应是类似下图的 IP 列表。
如果出现丢包或未收到数据包,请联系您的网络团队,通过 Ping 排查 `apigwx-aws.qualcomm.com` 的问题。
3. 确认客户端可以通过 Telnet 访问 API 端点。
* 在 Linux 终端中输入 `telnet apigwx-aws.qualcomm.com 443`。
预期显示 `Connected to *****.cloudfront.net` 消息。
* 按 Ctrl + C 关闭连接。
如果出现 `connection failed` 或 `timed out` 消息,请联系您的网络团队,
从您的客户端通过 Telnet 排查 `apigwx-aws.qualcomm.com` 的问题。
### Windows 客户端故障排除
请按顺序测试这些步骤。如果某一步成功完成,请继续下一项测试。
1. 确认客户端可以通过 DNS 解析 API 端点
* 打开 Windows 命令提示符。
* 输入 `nslookup` 并按 **Enter**。
* 输入 API 端点 \ [apigwx-aws.qualcomm.com](http://apigwx-aws.qualcomm.com/)\ ,然后按 Enter。
预期响应是类似下图的 IP 列表。
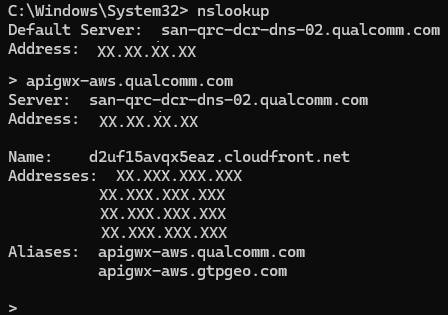 如果未返回任何 IP,请联系贵公司的 DNS 团队,排查客户端无法解析 `apigwx-aws.qualcomm.com`
或客户端 DNS 的任何问题。
1. 确认客户端可以通过 Ping 访问 API 端点
* 打开 Windows 命令提示符。
* 输入 `ping apigwx-aws.qualcomm.com`。
预期响应是如下图所示的零丢包显示。
.. figure:: ../images/ping\_windows.png
:alt: nslookup response
:scale: 70
如果出现丢包或未收到数据包,请联系您的网络团队,通过 Ping 排查 `apigwx-aws.qualcomm.com` 的问题。
2. 确认客户端可以通过 Tracert 访问 API 端点
* 打开 Windows 命令提示符。
.. \_api\_endpoint\_step\_two:
* 输入 `tracert apigwx-aws.qualcomm.com`。
预期响应是一条初始的 `Tracing route to XXXXXX.cloudfront.net [IP address]` 消息。
跟踪路由显示了从[步骤 2](https://docs.qualcomm.com/doc/80-72780-2/topic/troubleshooting.html?product=895724676033554725\&facet=Qualcomm%20Software%20Center\&version=2.0-rc2#api-endpoint-step-two) 到达端点所经过的互联网路由。
以下是预期响应的示例。
如果未返回任何 IP,请联系贵公司的 DNS 团队,排查客户端无法解析 `apigwx-aws.qualcomm.com`
或客户端 DNS 的任何问题。
1. 确认客户端可以通过 Ping 访问 API 端点
* 打开 Windows 命令提示符。
* 输入 `ping apigwx-aws.qualcomm.com`。
预期响应是如下图所示的零丢包显示。
.. figure:: ../images/ping\_windows.png
:alt: nslookup response
:scale: 70
如果出现丢包或未收到数据包,请联系您的网络团队,通过 Ping 排查 `apigwx-aws.qualcomm.com` 的问题。
2. 确认客户端可以通过 Tracert 访问 API 端点
* 打开 Windows 命令提示符。
.. \_api\_endpoint\_step\_two:
* 输入 `tracert apigwx-aws.qualcomm.com`。
预期响应是一条初始的 `Tracing route to XXXXXX.cloudfront.net [IP address]` 消息。
跟踪路由显示了从[步骤 2](https://docs.qualcomm.com/doc/80-72780-2/topic/troubleshooting.html?product=895724676033554725\&facet=Qualcomm%20Software%20Center\&version=2.0-rc2#api-endpoint-step-two) 到达端点所经过的互联网路由。
以下是预期响应的示例。
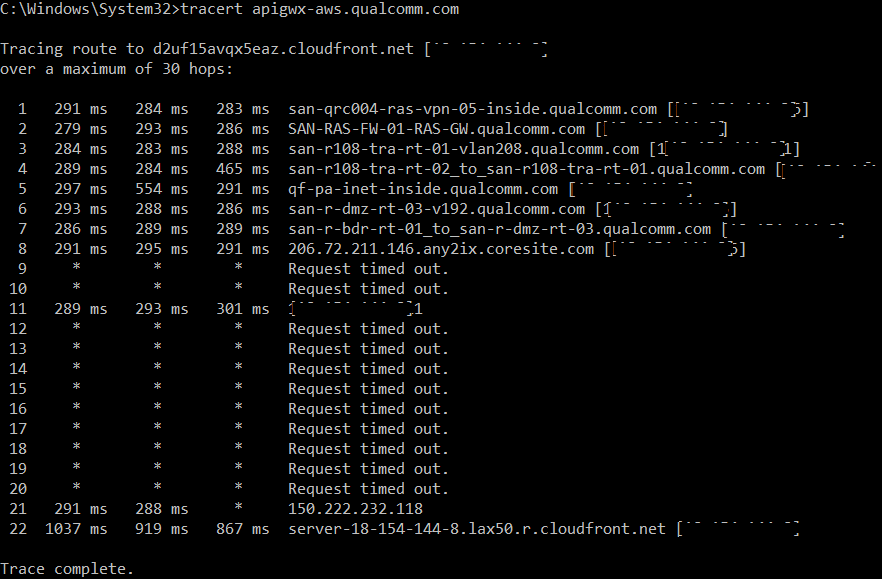 出现一些超时是正常的。
如果存在连接问题,例如最后一跳未能到达[步骤 2](https://docs.qualcomm.com/doc/80-72780-2/topic/troubleshooting.html?product=895724676033554725\&facet=Qualcomm%20Software%20Center\&version=2.0-rc2#api-endpoint-step-two) 中的端点,
则说明客户端到 `apigwx-aws.qualcomm.com` 端点的路由存在问题。请联系您的 IT 团队,
并提供 `client cannot route to the apigwx-aws.qualcomm.com Qualcomm endpoint` 消息的示例。
## Windows(WSL)上的 QSC Launcher 删除文件后磁盘空间未回收
在 WSL 内删除文件后,有时虚拟磁盘(`ext4.vhdx`)不会缩小,Windows 仍显示较高的磁盘使用率。这是因为 WSL 使用虚拟磁盘文件来存储 Linux 文件系统。在 WSL 内删除文件时,空间在内部被释放,但 VHDX 文件大小保持不变,因为 Windows 不会自动压缩它。要解决此问题,请手动压缩 VHDX 文件。
1. 使用以下命令关闭 WSL。
.. container:: nohighlight
出现一些超时是正常的。
如果存在连接问题,例如最后一跳未能到达[步骤 2](https://docs.qualcomm.com/doc/80-72780-2/topic/troubleshooting.html?product=895724676033554725\&facet=Qualcomm%20Software%20Center\&version=2.0-rc2#api-endpoint-step-two) 中的端点,
则说明客户端到 `apigwx-aws.qualcomm.com` 端点的路由存在问题。请联系您的 IT 团队,
并提供 `client cannot route to the apigwx-aws.qualcomm.com Qualcomm endpoint` 消息的示例。
## Windows(WSL)上的 QSC Launcher 删除文件后磁盘空间未回收
在 WSL 内删除文件后,有时虚拟磁盘(`ext4.vhdx`)不会缩小,Windows 仍显示较高的磁盘使用率。这是因为 WSL 使用虚拟磁盘文件来存储 Linux 文件系统。在 WSL 内删除文件时,空间在内部被释放,但 VHDX 文件大小保持不变,因为 Windows 不会自动压缩它。要解决此问题,请手动压缩 VHDX 文件。
1. 使用以下命令关闭 WSL。
.. container:: nohighlight
wsl --shutdown
1. 找到 VHDX 文件。
默认位置为 `%USERPROFILE%\AppData\Local\Packages\<Distro>\LocalState\ext4.vhdx`。
2. 使用 Hyper V 工具或 diskpart 压缩磁盘。
.. list-table::
*
* **Hyper V 工具**
* 在启用 Hyper V 功能的情况下使用 PowerShell:
.. container:: nohighlight
## Optimize-VHD -Path "C:\Path\To\ext4.vhdx" -Mode Full
* **diskpart**
* 使用 PowerShell:
.. container:: nohighlight
DiskPart
Select vdisk file="C:\Path\To\ext4.vhdx"
compact vdisk
exit
1. 使用以下命令验证执行这些步骤前后的文件大小。
.. container:: nohighlight
Get-Item "C:\Path\To\ext4.vhdx" | Select-Object Length
为防止此问题再次发生:
* 在大量删除后定期运行 Optimize-VHD。
* 避免在 WSL 内存储大型临时文件。
* 对临时数据使用挂载的 Windows 目录。
## 联系支持
有关技术问题,请访问[支持网站](https://mysupport.qualcomm.com/software-center)。
如需就本文档中的信息获得帮助或说明,请在
[https://support.qualcomm.com/.](https://support.qualcomm.com/.) 提交技术支持案例。您需要注册 Qualcomm ID 账户,并且贵公司
必须已启用支持才能访问案例系统。
提交支持案例报告问题时,请包含以下信息:
* 主机操作系统详细信息
* Qualcomm Software Center 桌面应用程序的版本
* 问题详情及准确的重现步骤
* 相关的 UI 屏幕截图
* 日志
要在 Qualcomm Software Center 桌面应用程序中收集日志,请转到 Help 菜单 > **Download Logs** > 选择日期范围 > **Download**。
日志可以从以下列出的位置手动收集。
Linux
* `/var/tmp/qcom/softwarecenter/logs`
* `/var/tmp/qcom/qik/logs`
Windows
* `C:\ProgramData\Qualcomm\SoftwareCenter\Logs`
* `%temp%\QIK\Logs`
* `%temp%\Qualcomm\QIK\Logs`
其他系统和支持资源列于 [https://qualcomm.com/support.](https://qualcomm.com/support.) 如需进一步
帮助,请发送电子邮件至 [qualcomm.support@qti.qualcomm.com](mailto:qualcomm.support%40qti.qualcomm.com)。