> ## Documentation Index
> Fetch the complete documentation index at: https://dragonwingdocs-staging.qualcomm.com/llms.txt
> Use this file to discover all available pages before exploring further.
# 执行 VIP 刷写
启用安全启动后,启动过程的每个阶段只有在经过数字签名并验证签名后,才会加载和运行下一个阶段。它从主启动加载程序 (PBL) 开始,加载辅助启动加载程序 (SBL) 或可扩展启动加载程序 (XBL)。如果签名检查在任何阶段失败,设备会立即停止。这确保只有受信任的、已签名的代码才能执行,从而保持设备安全。
已验证的镜像编程 (VIP) 增加了另一层控制。它允许您决定在刷写过程中可以将哪些文件和命令发送到设备。一旦芯片的熔丝被熔断,安全启动就永久启用。从此以后,设备只接受已签名的镜像——任何未签名的镜像都会导致刷写失败。此安全刷写过程称为 VIP 刷写。
## **创建摘要表**
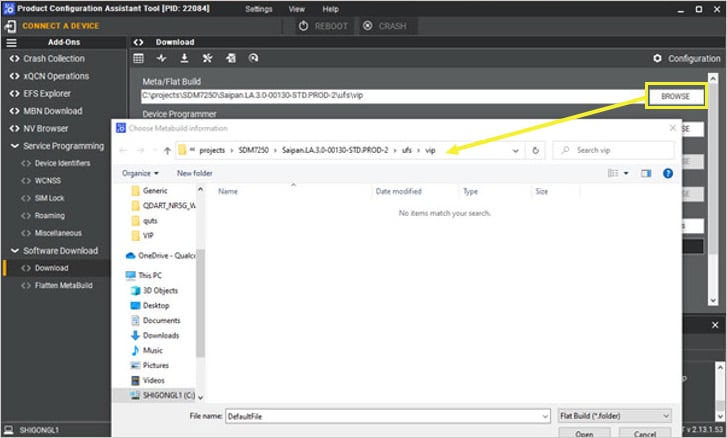
1. 选择必须使用 VIP 下载的已签名镜像文件。
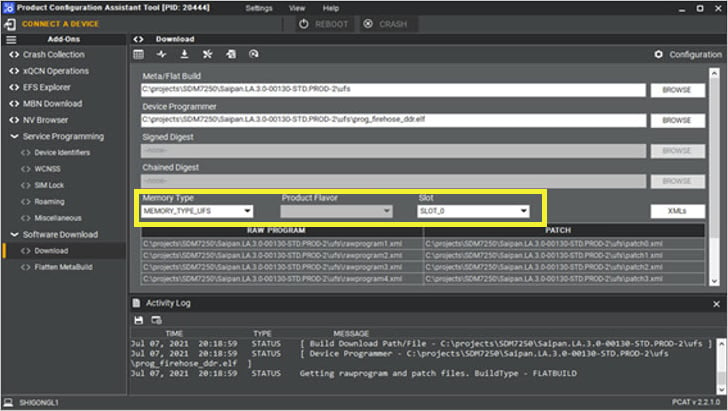
 2. 在 **Download** 窗口中选择正确的内存类型和其他参数。
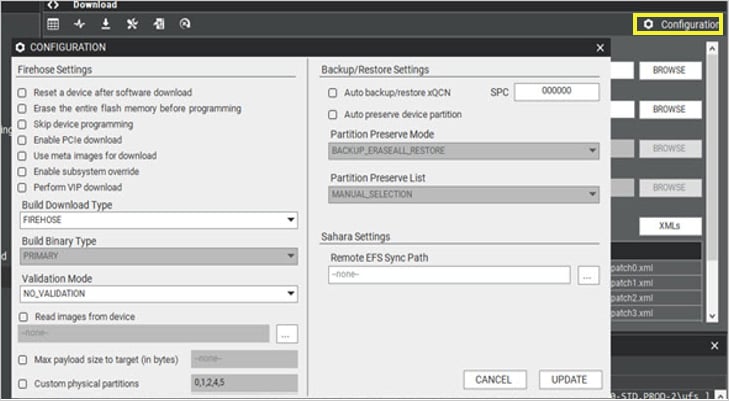
 3. 设置所有下载选项。
 > **注意**
> 确保生成摘要表时使用的配置与 VIP 下载期间使用的配置相匹配。例如,如果在生成摘要表时选择 **Erase the entire flash before programming**,则在 VIP 下载期间选择相同的选项。
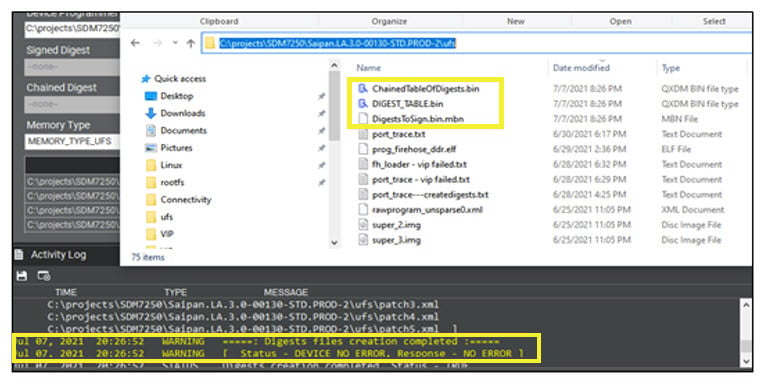
4. 选择 **Create Digest Files**。
> **注意**
> 确保生成摘要表时使用的配置与 VIP 下载期间使用的配置相匹配。例如,如果在生成摘要表时选择 **Erase the entire flash before programming**,则在 VIP 下载期间选择相同的选项。
4. 选择 **Create Digest Files**。
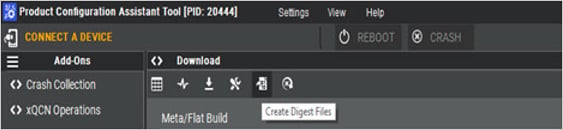 > 如果过程成功运行,它会在与构建相同的文件夹中生成摘要文件。
 ## **签名组件**
1. 使用以下命令,使用安全启动启用期间使用的相同密钥对 `DigestsToSign.bin.mbn` 镜像和 `Device Programmer` 镜像进行签名:
* 签名摘要表:
> ```text theme={null}
> /.LE.X.x/common/sectoolsv2/ext/Linux/sectools secure-image --sign /path/to/DigestsToSign.bin.mbn --image-id=VIP --security-profile /.LE.X.x/common/sectoolsv2/_security_profile.xml --oem-id=0x1 --oem-product-id=0xabcd --anti-rollback-version=0x0 --signing-mode=LOCAL --root-certificate=./OEM-KEYS/qpsa_rootca.cer --ca-certificate=./OEM-KEYS/qpsa_attestca.cer --ca-key=./OEM-KEYS/qpsa_attestca.key --outfile ./signed_images_out/DigestsToSign.bin.mbn
> ```
* 签名设备编程器:
> ```text theme={null}
> /.LE.X.x/common/sectoolsv2/ext/Linux/sectools secure-image --sign /path/to/prog_firehose_ddr.mbn --image-id=DEVICE-PROGRAMMER --security-profile /.LE.X.x/common/sectoolsv2/_security_profile.xml --oem-id=0x1 --oem-product-id=0xabcd --anti-rollback-version=0x0 --signing-mode=LOCAL --root-certificate=./OEM-KEYS/qpsa_rootca.cer --ca-certificate=./OEM-KEYS/qpsa_attestca.cer --ca-key=./OEM-KEYS/qpsa_attestca.key --outfile ./signed_images_out/prog_firehose_ddr.mbn
> ```
2. 确保以下事项:
> * 使用与您的安全启动启用配置匹配的值。例如,将 OEM ID `0x1` 和 OEM 产品 ID `0xabcd` 替换为您的特定值。
> * 用安全启动启用期间使用的相同安全配置文件替换 `_security_profile.xml`。
> * 签名密钥必须与安全启动启用期间使用的密钥匹配。
**注意**
如果目标 `DigestsToSign.bin.mbn` 预期为 MBNv6 格式(根据 `_security_profile.xml` 检查)并且 PCAT 未生成 MBNv6,请执行以下操作:
1. 从扁平构建文件夹中删除或删除任何现有的摘要文件,如 `ChainedTableOfDigests.bin`、`DIGEST_TABLE.bin` 或 `DigestsToSign.bin.mbn`。
2. 打开 PCAT 应用并转到 **Configuration**,将 **Digest Header Type** 更改为 **DIGEST\_HEADER\_TYPE\_NONE**。
3. 保持所有其他字段相同并重新生成摘要文件。
> 在输出中,您将看到:`ChainedTableOfDigests.bin`、`DIGEST_TABLE.bin` 和 `DigestsToSign.bin`,而不是 `Not DigestsToSign.bin.mbn`。
4. 运行命令将 .bin 转换为 .bin.mbn。
```text theme={null}
./sectools mbn-tool generate --data ./DigestsToSign.bin --outfile DigestsToSign.bin.mbn --mbn-version 6
```
5. 使用 `--image-id` VIP 签名 `DigestsToSign.bin.mbn`(在步骤 4 中生成)。
## **使用 PCAT 下载**
1. 在 PCAT 中选择 **Perform VIP download**。
## **签名组件**
1. 使用以下命令,使用安全启动启用期间使用的相同密钥对 `DigestsToSign.bin.mbn` 镜像和 `Device Programmer` 镜像进行签名:
* 签名摘要表:
> ```text theme={null}
> /.LE.X.x/common/sectoolsv2/ext/Linux/sectools secure-image --sign /path/to/DigestsToSign.bin.mbn --image-id=VIP --security-profile /.LE.X.x/common/sectoolsv2/_security_profile.xml --oem-id=0x1 --oem-product-id=0xabcd --anti-rollback-version=0x0 --signing-mode=LOCAL --root-certificate=./OEM-KEYS/qpsa_rootca.cer --ca-certificate=./OEM-KEYS/qpsa_attestca.cer --ca-key=./OEM-KEYS/qpsa_attestca.key --outfile ./signed_images_out/DigestsToSign.bin.mbn
> ```
* 签名设备编程器:
> ```text theme={null}
> /.LE.X.x/common/sectoolsv2/ext/Linux/sectools secure-image --sign /path/to/prog_firehose_ddr.mbn --image-id=DEVICE-PROGRAMMER --security-profile /.LE.X.x/common/sectoolsv2/_security_profile.xml --oem-id=0x1 --oem-product-id=0xabcd --anti-rollback-version=0x0 --signing-mode=LOCAL --root-certificate=./OEM-KEYS/qpsa_rootca.cer --ca-certificate=./OEM-KEYS/qpsa_attestca.cer --ca-key=./OEM-KEYS/qpsa_attestca.key --outfile ./signed_images_out/prog_firehose_ddr.mbn
> ```
2. 确保以下事项:
> * 使用与您的安全启动启用配置匹配的值。例如,将 OEM ID `0x1` 和 OEM 产品 ID `0xabcd` 替换为您的特定值。
> * 用安全启动启用期间使用的相同安全配置文件替换 `_security_profile.xml`。
> * 签名密钥必须与安全启动启用期间使用的密钥匹配。
**注意**
如果目标 `DigestsToSign.bin.mbn` 预期为 MBNv6 格式(根据 `_security_profile.xml` 检查)并且 PCAT 未生成 MBNv6,请执行以下操作:
1. 从扁平构建文件夹中删除或删除任何现有的摘要文件,如 `ChainedTableOfDigests.bin`、`DIGEST_TABLE.bin` 或 `DigestsToSign.bin.mbn`。
2. 打开 PCAT 应用并转到 **Configuration**,将 **Digest Header Type** 更改为 **DIGEST\_HEADER\_TYPE\_NONE**。
3. 保持所有其他字段相同并重新生成摘要文件。
> 在输出中,您将看到:`ChainedTableOfDigests.bin`、`DIGEST_TABLE.bin` 和 `DigestsToSign.bin`,而不是 `Not DigestsToSign.bin.mbn`。
4. 运行命令将 .bin 转换为 .bin.mbn。
```text theme={null}
./sectools mbn-tool generate --data ./DigestsToSign.bin --outfile DigestsToSign.bin.mbn --mbn-version 6
```
5. 使用 `--image-id` VIP 签名 `DigestsToSign.bin.mbn`(在步骤 4 中生成)。
## **使用 PCAT 下载**
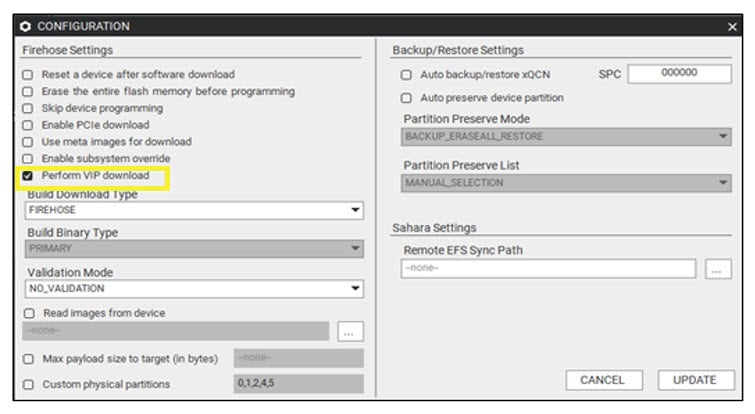
1. 在 PCAT 中选择 **Perform VIP download**。
 > **注意**
> 确保生成摘要表时使用的配置与 VIP 下载期间使用的配置相匹配。例如,如果在生成摘要表时选择 **Erase the entire flash before programming**,则在 VIP 下载期间选择相同的选项。
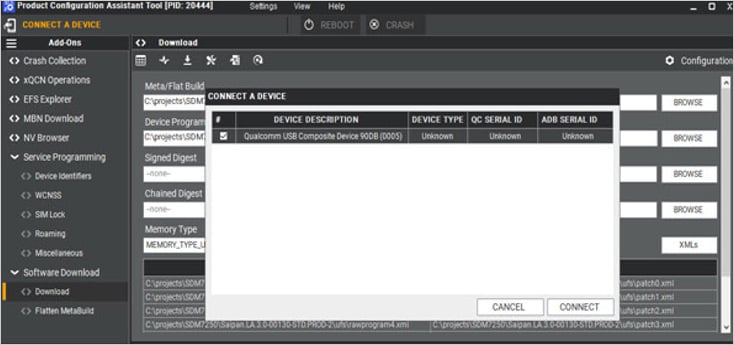
2. 连接安全设备。
> **注意**
> 确保生成摘要表时使用的配置与 VIP 下载期间使用的配置相匹配。例如,如果在生成摘要表时选择 **Erase the entire flash before programming**,则在 VIP 下载期间选择相同的选项。
2. 连接安全设备。
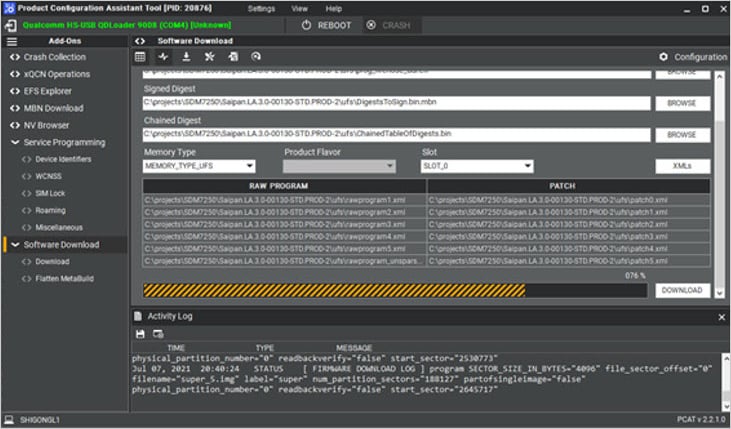
 3. 要执行 VIP 下载,请单击 **DOWNLOAD**。
 ## **后续步骤**
* 要强制执行严格的访问控制,请参阅 [启用 SELinux](/zh/System/Security/enable-se-linux)。
* 要确保在启动过程中仅加载经过验证和受信任的应用程序,请参阅 [启用 UEFI 安全启动](/zh/System/Security/enable-uefi-secure-boot)。
## **后续步骤**
* 要强制执行严格的访问控制,请参阅 [启用 SELinux](/zh/System/Security/enable-se-linux)。
* 要确保在启动过程中仅加载经过验证和受信任的应用程序,请参阅 [启用 UEFI 安全启动](/zh/System/Security/enable-uefi-secure-boot)。