> ## Documentation Index
> Fetch the complete documentation index at: https://dragonwingdocs-staging.qualcomm.com/llms.txt
> Use this file to discover all available pages before exploring further.
# 以太网
本指南介绍如何在 Qualcomm Dragonwing IQ-9075 EVK 上配置、操作以太网连接并排除故障。该平台支持接口枚举、数据通路、链路速度配置、MAC 地址管理、MTU 配置和网络诊断。
## 先决条件
* IQ-9075 EVK 硬件
* 以太网线缆(RJ45)
* 与 IQ-9075 EVK 在同一网络中的主机 PC
* SSH 客户端软件
* 基本的 Linux 命令行知识
## 架构
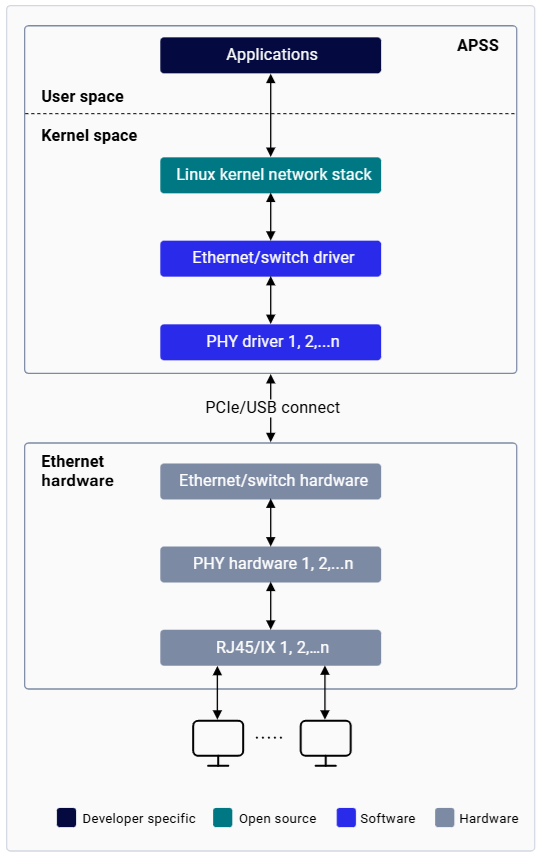 | 组件 | 说明 |
| ------------------ | --------------------------------------------------------- |
| **应用处理器子系统(APSS)** | 运行基于 Linux 的操作系统 |
| **以太网驱动** | 通过有线以太网接口提供数据连接的 Linux 内核驱动 |
| **PHY 驱动** | 管理以太网物理层的底层驱动;实现从初始化到链路建立的 PHY 生命周期状态机;通过 MDIO 访问 PHY 寄存器 |
| **以太网硬件** | 1× QEP8081 PHY,支持 10/100/1000/2500 Mbps,通过 RJ45 连接器启用 |
## 入门
| 组件 | 说明 |
| ------------------ | --------------------------------------------------------- |
| **应用处理器子系统(APSS)** | 运行基于 Linux 的操作系统 |
| **以太网驱动** | 通过有线以太网接口提供数据连接的 Linux 内核驱动 |
| **PHY 驱动** | 管理以太网物理层的底层驱动;实现从初始化到链路建立的 PHY 生命周期状态机;通过 MDIO 访问 PHY 寄存器 |
| **以太网硬件** | 1× QEP8081 PHY,支持 10/100/1000/2500 Mbps,通过 RJ45 连接器启用 |
## 入门
 ## 启用以太网
 继续之前,请先通过 Wi-Fi 上的 SSH 或串行提示符建立对设备的访问。有关说明,请参见[设置设备](../set-up-the-device)部分。
请在设备上刷写对应的 CDT,以确保以太网启用时使用正确的配置。
IQ-9075 EVK 出厂时带有出厂 MAC 地址。如需直接使用,可跳过此步骤。
要更改 MAC 地址:
```shell theme={null}
ip link set dev eth0 address XX:XX:XX:YY:YY:YY
```
此 MAC 地址仅在当前启动周期内有效。重启后,设备会恢复为持久存储中的地址。
在公共网络中,DHCP 服务器会自动分配 IP 地址。要手动分配静态 IP 地址:
```shell theme={null}
ip addr add 192.168.1.2 dev eth0
```
```shell theme={null}
ip link set dev eth0 down
ip link set dev eth0 mtu 1500
ip link set dev eth0 up
```
确认以下内容:
* `eth0` 出现在 `ip addr show` 输出中
* 接口状态显示 `UP BROADCAST RUNNING MULTICAST`
* IP 地址已正确分配
* MTU 已设置为所需值(通常为 1500)
* RX/TX 数据包计数器无错误
## 以太网操作
### 检查连通性
使用 `ping` 验证设备与远程主机之间的连通性。客户端 IP 地址必须与设备位于同一子网。
```shell theme={null}
ping 192.168.1.3
```
### 配置 NIC 设置
使用 `ethtool` 查看和配置 NIC 参数,如速度、双工和自动协商:
```shell theme={null}
ethtool eth0
```
查看 NIC 数据包统计信息:
```shell theme={null}
ethtool -S eth0
```
### 配置网络接口
在无法使用基于 DHCP 的自动 IP 分配时,使用 `ip addr add` 分配静态 IP 地址:
```shell theme={null}
ip addr add 192.168.1.2 dev eth0
```
### 抓取网络流量
使用 `tcpdump` 拦截和分析数据包:
```shell theme={null}
tcpdump -i any -s 0 -w /var/log/tcpdump.pcap
```
### 查看路由表
```shell theme={null}
ip r s
```
## 配置链路速度
从 `ethtool` 输出显示的支持模式中设置链路速度:
```shell theme={null}
ethtool -s eth0 autoneg on speed 1000 duplex full
```
## 故障排除
### 收集诊断日志
```bash theme={null}
dmesg > /var/log/dmesg_logs.txt
```
重点关注:驱动初始化消息、PHY 检测、链路状态变化和错误。
```bash theme={null}
tcpdump -i any -s 0 -w /var/log/tcpdump.pcap
```
按 `Ctrl+C` 停止抓包。
```bash theme={null}
scp root@:/var/log/tcpdump.pcap .
scp root@:/var/log/dmesg_logs.txt .
```
### 常见问题
**症状:** `ethtool end0` 显示 "Link detected: no";接口显示为 DOWN。
**步骤:**
```bash theme={null}
# Check PHY status
dmesg | grep -i phy
dmesg | grep -i end
# Verify interface is up
ip link show dev eth0
# Check auto-negotiation
ethtool eth0
```
**解决方法:** 更换故障线缆,确保两端连接牢固,验证链路对端已上电,检查 `dmesg` 中是否有 PHY 驱动错误。
**症状:** 已检测到链路,但 ping 失败;显示 "Destination Host Unreachable" 或 "Network is unreachable"。
**步骤:**
```bash theme={null}
# Verify IP configuration
ip addr show dev eth0
# Check routing table
ip route show
# Check ARP table
ip neigh show
# Capture ICMP traffic
tcpdump -i eth0 icmp
```
**解决方法:** 配置正确的 IP 地址和子网掩码;如有需要,添加默认网关(`route add default gw `);确认防火墙规则未阻止 ICMP。
**症状:** 高延迟、文件传输缓慢、丢包。
**步骤:**
```bash theme={null}
# Check link speed and duplex
ethtool eth0 | grep -E "Speed|Duplex"
# Check for errors
ethtool -S eth0 | grep -E "error|drop|collision"
# Check MTU
ip link show dev eth0 | grep mtu
```
**解决方法:** 如果自动协商失败,强制设置为 1000 Mbps 全双工;如检测到错误,更换线缆;根据特定网络需求调整 MTU。
**症状:** `eth0` 未出现在 `ip a show` 输出中。
**步骤:**
```bash theme={null}
# Show all interfaces including down
ip a show
# Check kernel logs
dmesg | grep -i ethernet
dmesg | grep -i emac
dmesg | grep -i "end0"
# Check device tree
ls /sys/class/net/
```
**解决方法:** 确保刷写了正确的 CDT;验证以太网驱动已编译进内核;检查 `dmesg` 中是否有硬件初始化错误;重启后再次检查。
### 高级诊断
**过滤与以太网相关的 dmesg 消息:**
```bash theme={null}
dmesg | grep -i 'eth|emac|phy|link'
```
**分析 tcpdump 抓包:**
```bash theme={null}
# Filter by protocol
tcpdump -r /var/log/tcpdump.pcap icmp
tcpdump -r /var/log/tcpdump.pcap tcp
# Filter by host
tcpdump -r /var/log/tcpdump.pcap host 192.168.1.10
```
如需详细分析,请在主机 PC 上用 Wireshark 打开 `.pcap` 文件。
**实时监控硬件统计信息:**
```bash theme={null}
watch -n 1 'ethtool -S eth0 | head -20'
```
## 命令参考
| 命令 | 用途 | 示例 |
| ----------------- | ----------- | ------------------- |
| `dmesg` | 查看内核消息 | `dmesg \| grep eth` |
| `ethtool ` | 检查链路状态 | `ethtool end0` |
| `ethtool -S ` | 查看 NIC 统计信息 | `ethtool -S end0` |
| `ip addr show` | 显示 IP 地址 | `ip addr show end0` |
| `ip route show` | 显示路由表 | `ip route show` |
| `ping ` | 测试连通性 | `ping 192.168.1.10` |
| `tcpdump -i ` | 抓取数据包 | `tcpdump -i end0` |
| `netstat -r` | 显示路由 | `netstat -r` |
| `netstat -i` | 显示接口统计 | `netstat -i` |
## 资源
* [ethtool 手册页](https://man7.org/linux/man-pages/man8/ethtool.8.html)
* [netstat 手册页](https://man7.org/linux/man-pages/man8/netstat.8.html)
* [ip 命令手册页](https://man7.org/linux/man-pages/man8/ip.8.html)
* [tcpdump 手册页](https://www.tcpdump.org/manpages/tcpdump.1.html)
继续之前,请先通过 Wi-Fi 上的 SSH 或串行提示符建立对设备的访问。有关说明,请参见[设置设备](../set-up-the-device)部分。
请在设备上刷写对应的 CDT,以确保以太网启用时使用正确的配置。
IQ-9075 EVK 出厂时带有出厂 MAC 地址。如需直接使用,可跳过此步骤。
要更改 MAC 地址:
```shell theme={null}
ip link set dev eth0 address XX:XX:XX:YY:YY:YY
```
此 MAC 地址仅在当前启动周期内有效。重启后,设备会恢复为持久存储中的地址。
在公共网络中,DHCP 服务器会自动分配 IP 地址。要手动分配静态 IP 地址:
```shell theme={null}
ip addr add 192.168.1.2 dev eth0
```
```shell theme={null}
ip link set dev eth0 down
ip link set dev eth0 mtu 1500
ip link set dev eth0 up
```
确认以下内容:
* `eth0` 出现在 `ip addr show` 输出中
* 接口状态显示 `UP BROADCAST RUNNING MULTICAST`
* IP 地址已正确分配
* MTU 已设置为所需值(通常为 1500)
* RX/TX 数据包计数器无错误
## 以太网操作
### 检查连通性
使用 `ping` 验证设备与远程主机之间的连通性。客户端 IP 地址必须与设备位于同一子网。
```shell theme={null}
ping 192.168.1.3
```
### 配置 NIC 设置
使用 `ethtool` 查看和配置 NIC 参数,如速度、双工和自动协商:
```shell theme={null}
ethtool eth0
```
查看 NIC 数据包统计信息:
```shell theme={null}
ethtool -S eth0
```
### 配置网络接口
在无法使用基于 DHCP 的自动 IP 分配时,使用 `ip addr add` 分配静态 IP 地址:
```shell theme={null}
ip addr add 192.168.1.2 dev eth0
```
### 抓取网络流量
使用 `tcpdump` 拦截和分析数据包:
```shell theme={null}
tcpdump -i any -s 0 -w /var/log/tcpdump.pcap
```
### 查看路由表
```shell theme={null}
ip r s
```
## 配置链路速度
从 `ethtool` 输出显示的支持模式中设置链路速度:
```shell theme={null}
ethtool -s eth0 autoneg on speed 1000 duplex full
```
## 故障排除
### 收集诊断日志
```bash theme={null}
dmesg > /var/log/dmesg_logs.txt
```
重点关注:驱动初始化消息、PHY 检测、链路状态变化和错误。
```bash theme={null}
tcpdump -i any -s 0 -w /var/log/tcpdump.pcap
```
按 `Ctrl+C` 停止抓包。
```bash theme={null}
scp root@:/var/log/tcpdump.pcap .
scp root@:/var/log/dmesg_logs.txt .
```
### 常见问题
**症状:** `ethtool end0` 显示 "Link detected: no";接口显示为 DOWN。
**步骤:**
```bash theme={null}
# Check PHY status
dmesg | grep -i phy
dmesg | grep -i end
# Verify interface is up
ip link show dev eth0
# Check auto-negotiation
ethtool eth0
```
**解决方法:** 更换故障线缆,确保两端连接牢固,验证链路对端已上电,检查 `dmesg` 中是否有 PHY 驱动错误。
**症状:** 已检测到链路,但 ping 失败;显示 "Destination Host Unreachable" 或 "Network is unreachable"。
**步骤:**
```bash theme={null}
# Verify IP configuration
ip addr show dev eth0
# Check routing table
ip route show
# Check ARP table
ip neigh show
# Capture ICMP traffic
tcpdump -i eth0 icmp
```
**解决方法:** 配置正确的 IP 地址和子网掩码;如有需要,添加默认网关(`route add default gw `);确认防火墙规则未阻止 ICMP。
**症状:** 高延迟、文件传输缓慢、丢包。
**步骤:**
```bash theme={null}
# Check link speed and duplex
ethtool eth0 | grep -E "Speed|Duplex"
# Check for errors
ethtool -S eth0 | grep -E "error|drop|collision"
# Check MTU
ip link show dev eth0 | grep mtu
```
**解决方法:** 如果自动协商失败,强制设置为 1000 Mbps 全双工;如检测到错误,更换线缆;根据特定网络需求调整 MTU。
**症状:** `eth0` 未出现在 `ip a show` 输出中。
**步骤:**
```bash theme={null}
# Show all interfaces including down
ip a show
# Check kernel logs
dmesg | grep -i ethernet
dmesg | grep -i emac
dmesg | grep -i "end0"
# Check device tree
ls /sys/class/net/
```
**解决方法:** 确保刷写了正确的 CDT;验证以太网驱动已编译进内核;检查 `dmesg` 中是否有硬件初始化错误;重启后再次检查。
### 高级诊断
**过滤与以太网相关的 dmesg 消息:**
```bash theme={null}
dmesg | grep -i 'eth|emac|phy|link'
```
**分析 tcpdump 抓包:**
```bash theme={null}
# Filter by protocol
tcpdump -r /var/log/tcpdump.pcap icmp
tcpdump -r /var/log/tcpdump.pcap tcp
# Filter by host
tcpdump -r /var/log/tcpdump.pcap host 192.168.1.10
```
如需详细分析,请在主机 PC 上用 Wireshark 打开 `.pcap` 文件。
**实时监控硬件统计信息:**
```bash theme={null}
watch -n 1 'ethtool -S eth0 | head -20'
```
## 命令参考
| 命令 | 用途 | 示例 |
| ----------------- | ----------- | ------------------- |
| `dmesg` | 查看内核消息 | `dmesg \| grep eth` |
| `ethtool ` | 检查链路状态 | `ethtool end0` |
| `ethtool -S ` | 查看 NIC 统计信息 | `ethtool -S end0` |
| `ip addr show` | 显示 IP 地址 | `ip addr show end0` |
| `ip route show` | 显示路由表 | `ip route show` |
| `ping ` | 测试连通性 | `ping 192.168.1.10` |
| `tcpdump -i ` | 抓取数据包 | `tcpdump -i end0` |
| `netstat -r` | 显示路由 | `netstat -r` |
| `netstat -i` | 显示接口统计 | `netstat -i` |
## 资源
* [ethtool 手册页](https://man7.org/linux/man-pages/man8/ethtool.8.html)
* [netstat 手册页](https://man7.org/linux/man-pages/man8/netstat.8.html)
* [ip 命令手册页](https://man7.org/linux/man-pages/man8/ip.8.html)
* [tcpdump 手册页](https://www.tcpdump.org/manpages/tcpdump.1.html)