> ## Documentation Index
> Fetch the complete documentation index at: https://dragonwingdocs-staging.qualcomm.com/llms.txt
> Use this file to discover all available pages before exploring further.
# 启动您的设备
## 简介
介绍在设备烧录完成后如何访问设备。您可以使用以下两种连接方式之一:
* UART,用于低级串行控制台访问
* ADB,用于标准 shell 访问
## 使用 UART 连接
### 安装 Minicom
Minicom 是一款轻量级、基于终端的串行通信程序,在 Linux 系统上
用于通过 UART(串行)连接与设备交互。它允许您访问设备的
控制台、查看启动日志,并以底层方式直接向系统发送命令。
在主机系统上安装 Minicom:
```bash theme={null}
sudo apt install minicom
```
### 连接
* 要建立调试 UART 连接并查看诊断消息,请使用相应的调试 UART 线缆将设备连接到 Linux 主机。
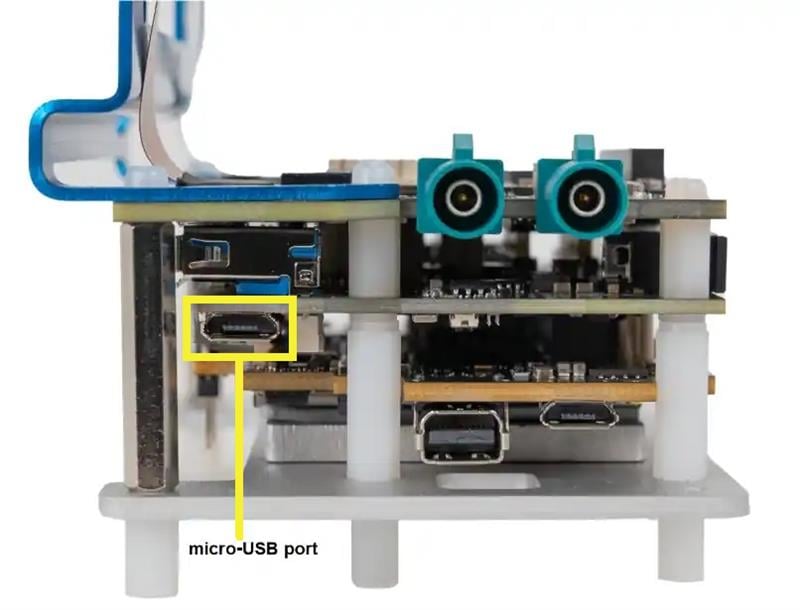
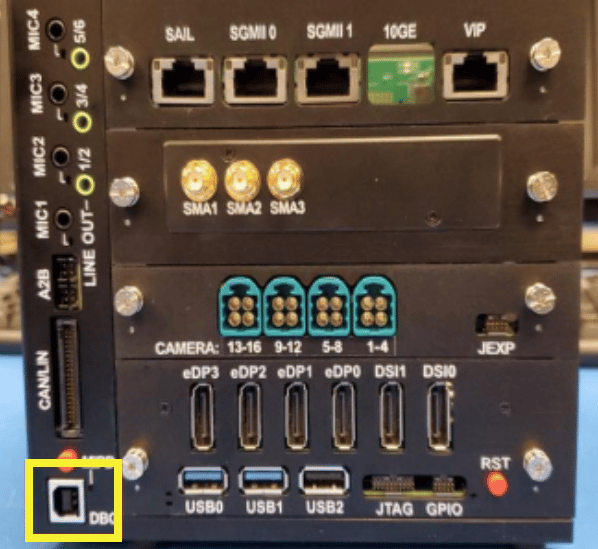
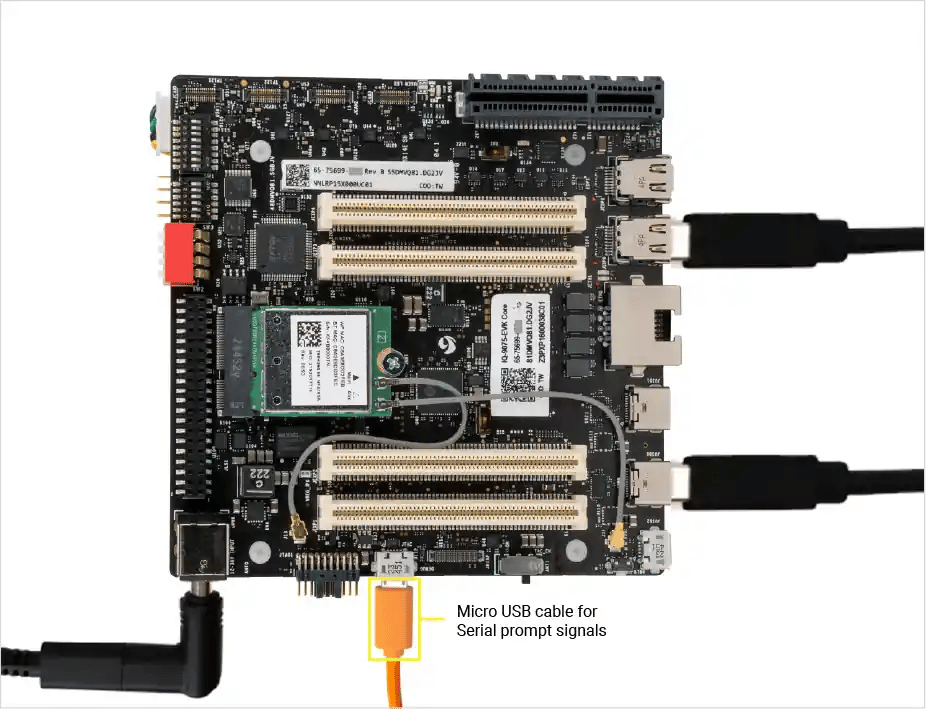
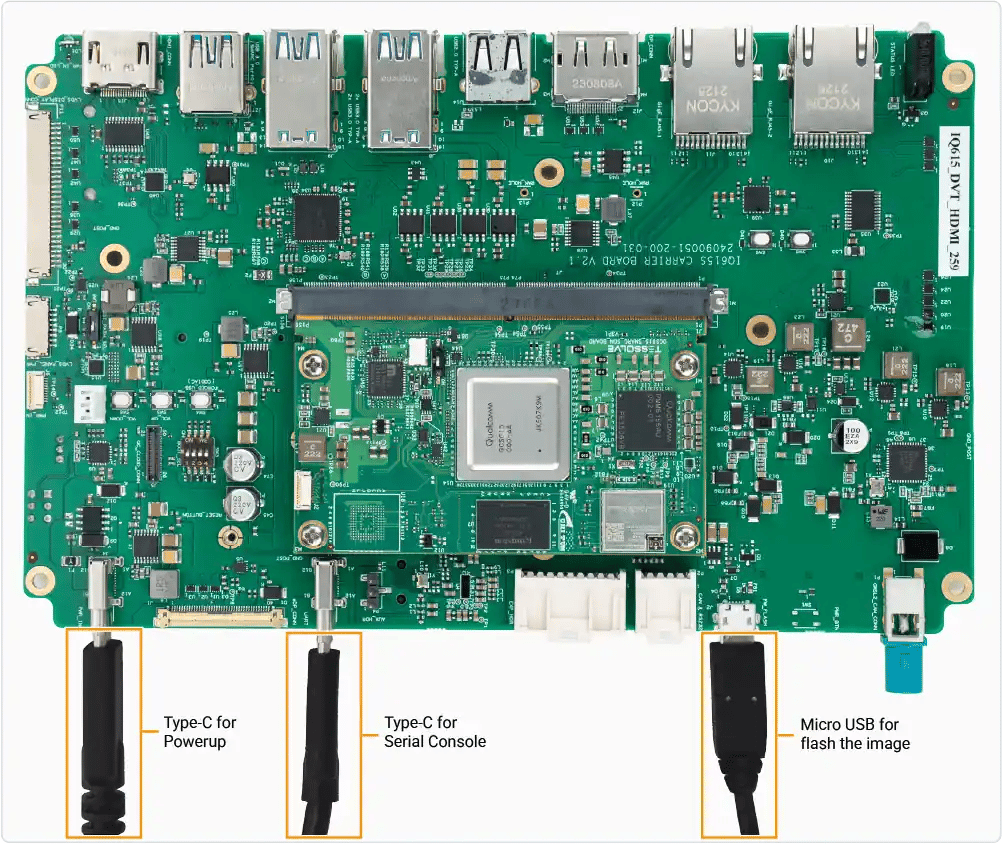
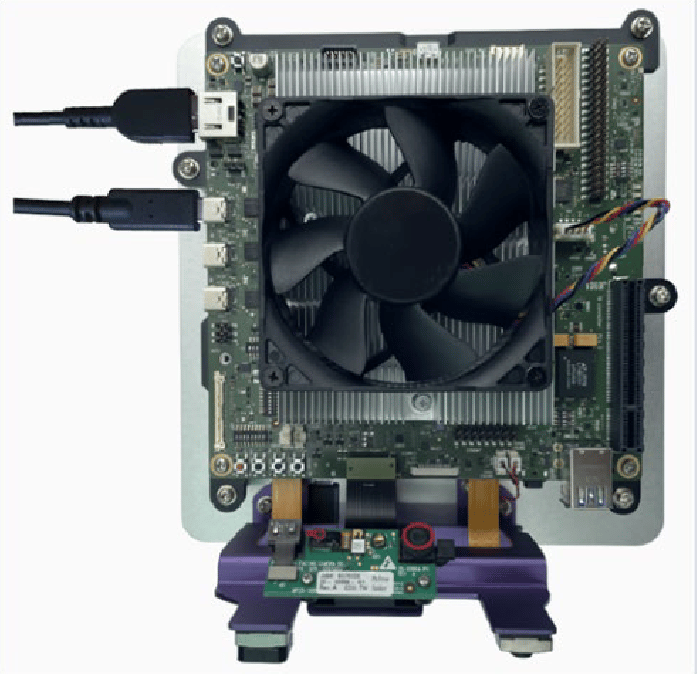 使用 USB-A 转 USB-C 线缆将 EVK 连接到主机计算机。
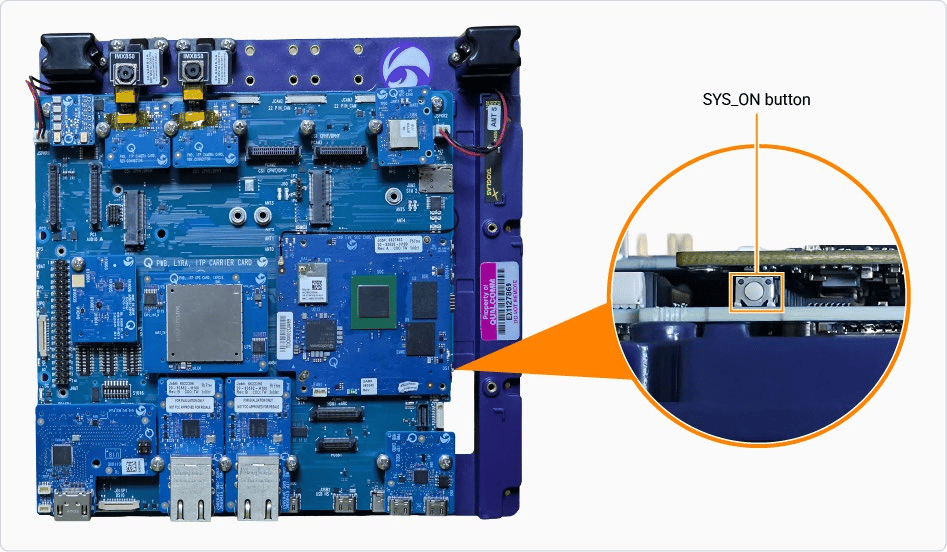
在 IQ-2390 EVK 上,刷写完成后关闭 S1011-1 DIP 开关,然后在打开 UART 控制台后按 **SYS\_ON** 按钮启动引导过程。
使用 USB-A 转 USB-C 线缆将 EVK 连接到主机计算机。
在 IQ-2390 EVK 上,刷写完成后关闭 S1011-1 DIP 开关,然后在打开 UART 控制台后按 **SYS\_ON** 按钮启动引导过程。
 * 检查是否检测到 USB 端口:
```bash theme={null}
ls /dev/ttyUSB*
```
```text Sample output theme={null}
/dev/ttyUSB0
```
* 打开 Minicom:
```bash theme={null}
sudo minicom -s
```
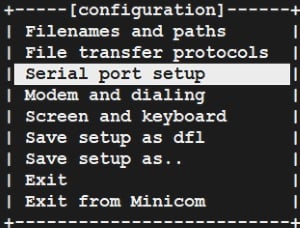
* 使用向下方向键选择 **Serial port setup** 选项。使用向上和向下方向键在菜单中导航。
* 检查是否检测到 USB 端口:
```bash theme={null}
ls /dev/ttyUSB*
```
```text Sample output theme={null}
/dev/ttyUSB0
```
* 打开 Minicom:
```bash theme={null}
sudo minicom -s
```
* 使用向下方向键选择 **Serial port setup** 选项。使用向上和向下方向键在菜单中导航。
 * 设置串行设备配置:
* 在键盘上按 **A** 键设置串行设备名称,例如 `/dev/ttyUSB0`。
* 按 **Enter** 保存更改。
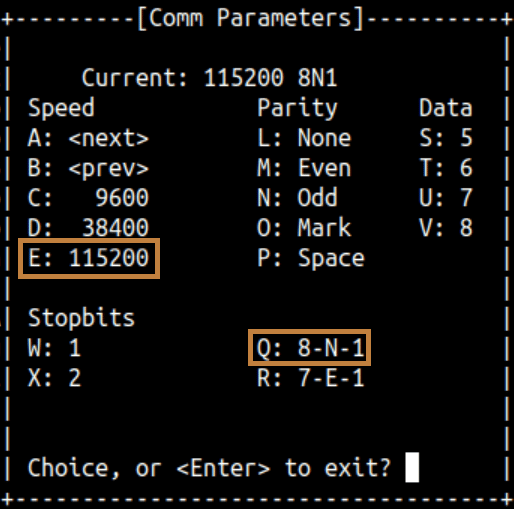
* 在键盘上按 **E** 键设置波特率和 8N1 配置:
* 如果波特率未设置为 **115200**,请再次按 **E** 键。
* 如果配置未设置为 **8N1**,请按 **Q** 键。
* 设置串行设备配置:
* 在键盘上按 **A** 键设置串行设备名称,例如 `/dev/ttyUSB0`。
* 按 **Enter** 保存更改。
* 在键盘上按 **E** 键设置波特率和 8N1 配置:
* 如果波特率未设置为 **115200**,请再次按 **E** 键。
* 如果配置未设置为 **8N1**,请按 **Q** 键。
 * 按 **Enter** 保存更改。
* 在键盘上按 **F** 键将 **Hardware Flow Control** 设置为 `No`。
* 按 **Enter** 保存更改。
* 在键盘上按 **F** 键将 **Hardware Flow Control** 设置为 `No`。
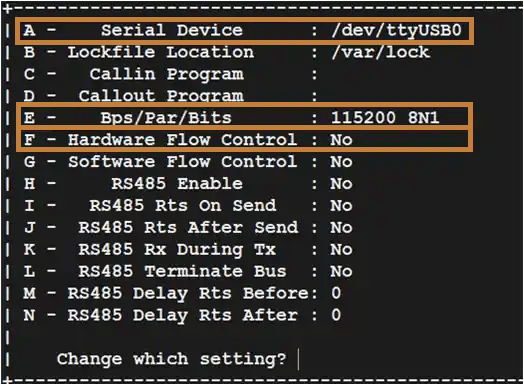 * 按 **Enter** 保存更改。
* 选择 **Save setup as dfl** 选项,然后按 **Enter**。
* 按 **Enter** 保存更改。
* 选择 **Save setup as dfl** 选项,然后按 **Enter**。
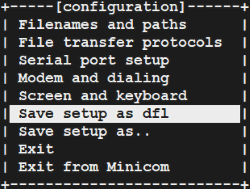 * 选择 **EXIT** 打开 UART 控制台,然后按 **Enter**。
* 登录 UART 控制台:
* 登录名:`root`
* 密码:`oelinux123`
如果登录控制台未按预期显示,请检查 USB 连接。如果问题仍然存在,请断开并重新连接 micro-USB。
## 使用 ADB 连接
设备上的 `adbd` 默认处于禁用状态,使用前必须显式启用。
### 安装 ADB
ADB 用于与正在运行的设备通信,并且是从操作系统触发重启
进入 EDL 模式所必需的。它提供了一种便捷的方式,无需手动干预
即可将设备切换到适合刷写的正确状态。
* 使用系统软件包管理器在主机系统上安装 `adb`:
```bash theme={null}
sudo apt install android-tools-adb android-tools-fastboot
```
* 验证系统上是否已安装 `adb`:
```bash theme={null}
adb --version
```
```text Sample output theme={null}
Android Debug Bridge version 1.0.39
Version 1:8.1.0+r23-5ubuntu2
```
* `adbd` 服务默认处于禁用状态。在使用 `adb` 之前,需要进行一次性设置来
启用该服务。
* 按照
[通过 UART 连接](/zh/Key-Documents/Flash-Guide/boot-up#connect-via-uart)指南连接到设备。
* 创建文件 `/etc/usb-debugging-enabled` 以启用 `adbd`。
```bash theme={null}
touch /etc/usb-debugging-enabled
```
* 配置 `adbd` 服务以自动启动。
```bash theme={null}
systemctl enable --now android-tools-adbd
```
### 连接
* 使用 USB Type-C 线缆将设备连接到主机。
* 确保 `adb` 已将该设备识别为设备:
```bash theme={null}
adb devices
```
```text Sample output theme={null}
List of devices attached
68f592a device
```
* 连接到 `adb` shell:
```bash theme={null}
adb shell
```
* 选择 **EXIT** 打开 UART 控制台,然后按 **Enter**。
* 登录 UART 控制台:
* 登录名:`root`
* 密码:`oelinux123`
如果登录控制台未按预期显示,请检查 USB 连接。如果问题仍然存在,请断开并重新连接 micro-USB。
## 使用 ADB 连接
设备上的 `adbd` 默认处于禁用状态,使用前必须显式启用。
### 安装 ADB
ADB 用于与正在运行的设备通信,并且是从操作系统触发重启
进入 EDL 模式所必需的。它提供了一种便捷的方式,无需手动干预
即可将设备切换到适合刷写的正确状态。
* 使用系统软件包管理器在主机系统上安装 `adb`:
```bash theme={null}
sudo apt install android-tools-adb android-tools-fastboot
```
* 验证系统上是否已安装 `adb`:
```bash theme={null}
adb --version
```
```text Sample output theme={null}
Android Debug Bridge version 1.0.39
Version 1:8.1.0+r23-5ubuntu2
```
* `adbd` 服务默认处于禁用状态。在使用 `adb` 之前,需要进行一次性设置来
启用该服务。
* 按照
[通过 UART 连接](/zh/Key-Documents/Flash-Guide/boot-up#connect-via-uart)指南连接到设备。
* 创建文件 `/etc/usb-debugging-enabled` 以启用 `adbd`。
```bash theme={null}
touch /etc/usb-debugging-enabled
```
* 配置 `adbd` 服务以自动启动。
```bash theme={null}
systemctl enable --now android-tools-adbd
```
### 连接
* 使用 USB Type-C 线缆将设备连接到主机。
* 确保 `adb` 已将该设备识别为设备:
```bash theme={null}
adb devices
```
```text Sample output theme={null}
List of devices attached
68f592a device
```
* 连接到 `adb` shell:
```bash theme={null}
adb shell
```