> ## Documentation Index
> Fetch the complete documentation index at: https://dragonwingdocs-staging.qualcomm.com/llms.txt
> Use this file to discover all available pages before exploring further.
# 使用 AI Hub 优化模型
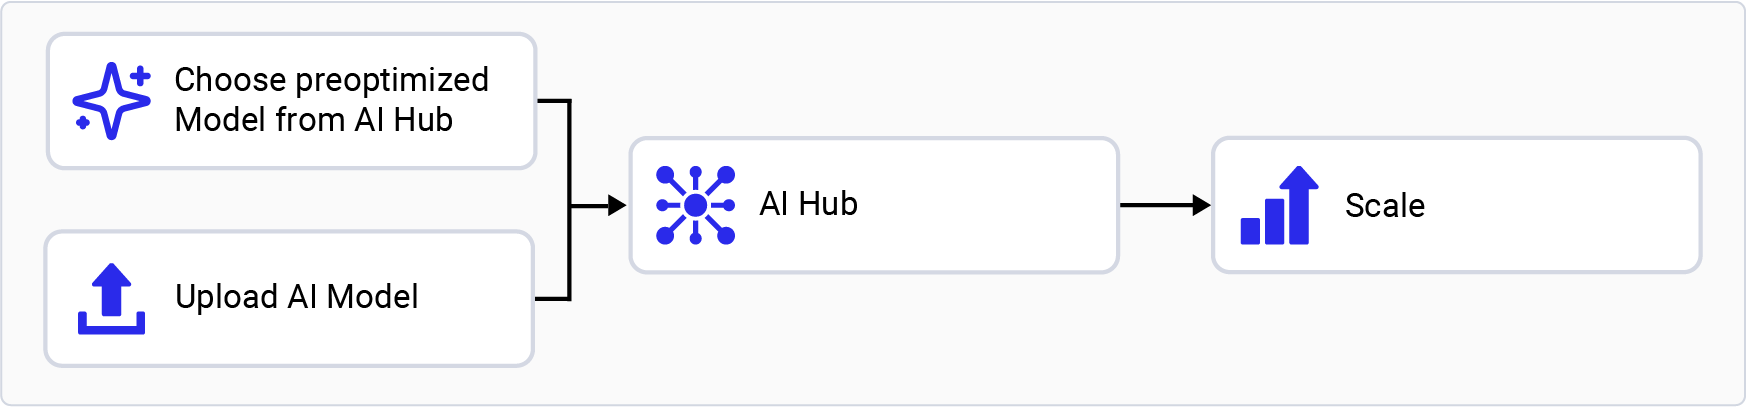
> 使用 Qualcomm AI Hub 下载预优化模型,或编译和优化您自己的模型,以便在 Qualcomm Dragonwing 物联网平台上部署。
为了在 Qualcomm AI 硬件上快速进行模型原型验证,AI Hub
提供了一种在设备端优化、验证和部署机器学习模型的方式,
适用于视觉、音频和语音用例。
 ## 设置您的环境
1. 设置您的 Python 环境。在主机上安装
[miniconda](https://docs.conda.io/projects/miniconda/en/latest/miniconda-install.html)。
为 AI Hub 设置 Python 虚拟环境:
```shell theme={null}
conda activate
```
```shell theme={null}
conda create python=3.10 -n qai_hub
```
```shell theme={null}
conda activate qai_hub
```
2. 安装 git。
```shell theme={null}
sudo apt-get install git
```
3. 安装 AI Hub Python 客户端。
```shell theme={null}
pip3 install qai-hub
```
```shell theme={null}
pip3 install "qai-hub[torch]"
```
4. 登录 AI Hub。
访问 [AI Hub](https://aihub.qualcomm.com/),使用您的
Qualcomm ID 登录,以查看您创建的作业信息。
登录后,前往 **Account > Settings > API Token** 获取用于配置客户端的 API token。
5. 在终端中使用以下命令,
通过您的 API token 配置客户端。
```shell theme={null}
qai-hub configure --api_token
```
## 选择 AI Hub 工作流
### 试用预优化模型
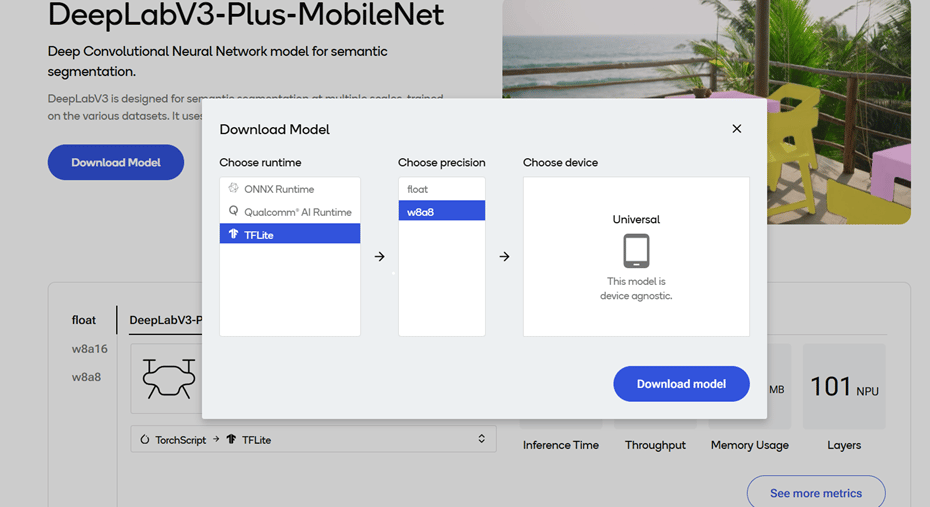
1. 前往 [AI Hub Model Zoo](https://aihub.qualcomm.com/iot/models),获取适用于 Qualcomm 评估套件的预优化模型。
2. 在左侧窗格中选择匹配的芯片组,筛选适用于您 EVK 的模型。例如,
为 Qualcomm Dragonwing™ RB3 Gen 2 选择 **Qualcomm QCS6490**,或为 Qualcomm Dragonwing™ IQ-8275 EVK
选择 **Qualcomm QCS8300**。
3. 从筛选结果中选择一个模型,进入该模型页面。
4. 在模型页面上,选择运行时和精度。
5. 选择 **Download** 下载模型。下载的模型已经过预优化,可以直接部署。有关更多信息,请参阅[运行推理](../map/use-available-frameworks-and-runtimes)。
## 设置您的环境
1. 设置您的 Python 环境。在主机上安装
[miniconda](https://docs.conda.io/projects/miniconda/en/latest/miniconda-install.html)。
为 AI Hub 设置 Python 虚拟环境:
```shell theme={null}
conda activate
```
```shell theme={null}
conda create python=3.10 -n qai_hub
```
```shell theme={null}
conda activate qai_hub
```
2. 安装 git。
```shell theme={null}
sudo apt-get install git
```
3. 安装 AI Hub Python 客户端。
```shell theme={null}
pip3 install qai-hub
```
```shell theme={null}
pip3 install "qai-hub[torch]"
```
4. 登录 AI Hub。
访问 [AI Hub](https://aihub.qualcomm.com/),使用您的
Qualcomm ID 登录,以查看您创建的作业信息。
登录后,前往 **Account > Settings > API Token** 获取用于配置客户端的 API token。
5. 在终端中使用以下命令,
通过您的 API token 配置客户端。
```shell theme={null}
qai-hub configure --api_token
```
## 选择 AI Hub 工作流
### 试用预优化模型
1. 前往 [AI Hub Model Zoo](https://aihub.qualcomm.com/iot/models),获取适用于 Qualcomm 评估套件的预优化模型。
2. 在左侧窗格中选择匹配的芯片组,筛选适用于您 EVK 的模型。例如,
为 Qualcomm Dragonwing™ RB3 Gen 2 选择 **Qualcomm QCS6490**,或为 Qualcomm Dragonwing™ IQ-8275 EVK
选择 **Qualcomm QCS8300**。
3. 从筛选结果中选择一个模型,进入该模型页面。
4. 在模型页面上,选择运行时和精度。
5. 选择 **Download** 下载模型。下载的模型已经过预优化,可以直接部署。有关更多信息,请参阅[运行推理](../map/use-available-frameworks-and-runtimes)。
 ### 自带模型
1. 选择 PyTorch 或 ONNX 格式的预训练模型。
2. 使用 Python API 向 AI Hub 提交模型进行编译或优化。
提交编译作业时,为您的 EVK 选择设备或芯片组以及目标运行时。对于 Qualcomm Dragonwing™ RB3 Gen 2,支持 LiteRT 运行时。
| **芯片组** | **运行时** | **CPU** | **GPU** | **HTP** |
| ------------------------------ | ------- | --------------- | --------- | ---------- |
| Qualcomm Dragonwing™ RB3 Gen 2 | LiteRT | INT8,FP16, FP32 | FP16,FP32 | INT8,INT16 |
提交后,AI Hub 会为该作业生成唯一 ID。您可以使用
此作业 ID 查看作业详情。
3. AI Hub 根据您选择的设备和运行时优化模型。
* 您还可以选择提交一个作业,在从设备农场调配的真实设备上
对优化后的模型进行性能分析或运行推理
(使用 Python API)。
* **性能分析**: 在调配的设备上对模型进行基准测试,并
提供统计信息,包括层级别的平均推理时间、
运行时配置等。
* **推理**: 在调配的设备上运行模型,使用优化后的模型
对作为推理作业一部分提交的数据
执行推理。
4. 每个提交的作业都可以在 AI Hub 门户中查看。完成的编译作业会提供优化后模型的下载链接,随后可将其部署到本地开发设备,例如 Qualcomm Dragonwing™ RB3 Gen 2。
以下示例取自 [AI Hub 文档](https://workbench.aihub.qualcomm.com/docs/),它将 PyTorch 中的预训练 MobileNet V2 模型上传到 AI Hub,并将其编译为针对 Qualcomm Dragonwing™ RB3 Gen 2 优化的 LiteRT 模型。
```python theme={null}
import qai_hub as hub
import torch
from torchvision.models import mobilenet_v2
import numpy as np
# Using pre-trained MobileNet
torch_model = mobilenet_v2(pretrained=True)
torch_model.eval()
# Trace model (for on-device deployment)
input_shape = (1, 3, 224, 224)
example_input = torch.rand(input_shape)
traced_torch_model = torch.jit.trace(torch_model, example_input)
# Compile and optimize the model for a specific device
compile_job = hub.submit_compile_job(
model=traced_torch_model,
device=hub.Device("Dragonwing RB3 Gen 2 Vision Kit"),
input_specs=dict(image=input_shape),
#compile_options="--target_runtime tflite",
)
# Profiling Job
profile_job = hub.submit_profile_job(
model=compile_job.get_target_model(),
device=hub.Device("Dragonwing RB3 Gen 2 Vision Kit"),
)
sample = np.random.random((1, 3, 224, 224)).astype(np.float32)
# Inference Job
inference_job = hub.submit_inference_job(
model=compile_job.get_target_model(),
device=hub.Device("Dragonwing RB3 Gen 2 Vision Kit"),
inputs=dict(image=[sample]),
)
# Download model
compile_job.download_target_model(filename="/tmp/mobilenetv2.tflite")
```
要停用先前激活的 `qai_hub` 环境,请使用以下命令。
```shell theme={null}
conda deactivate
```
模型下载完成后即可部署。有关后续步骤,请参阅[运行推理](../map/use-available-frameworks-and-runtimes)。
有关 AI Hub 工作流和 API 的更多详细信息,请参阅 [AI Hub 文档](https://workbench.aihub.qualcomm.com/docs/hub/index.html#examples)、
浏览 [AI Hub 教程视频](https://www.youtube.com/watch?v=V1CDWYZ7Shw\&list=PLxeazpXYyqtOowtUdvigvAgMV5_K1KIrh),
或观看以下关于如何在 AI Hub 中分析模型性能的视频。
### 自带模型
1. 选择 PyTorch 或 ONNX 格式的预训练模型。
2. 使用 Python API 向 AI Hub 提交模型进行编译或优化。
提交编译作业时,为您的 EVK 选择设备或芯片组以及目标运行时。对于 Qualcomm Dragonwing™ RB3 Gen 2,支持 LiteRT 运行时。
| **芯片组** | **运行时** | **CPU** | **GPU** | **HTP** |
| ------------------------------ | ------- | --------------- | --------- | ---------- |
| Qualcomm Dragonwing™ RB3 Gen 2 | LiteRT | INT8,FP16, FP32 | FP16,FP32 | INT8,INT16 |
提交后,AI Hub 会为该作业生成唯一 ID。您可以使用
此作业 ID 查看作业详情。
3. AI Hub 根据您选择的设备和运行时优化模型。
* 您还可以选择提交一个作业,在从设备农场调配的真实设备上
对优化后的模型进行性能分析或运行推理
(使用 Python API)。
* **性能分析**: 在调配的设备上对模型进行基准测试,并
提供统计信息,包括层级别的平均推理时间、
运行时配置等。
* **推理**: 在调配的设备上运行模型,使用优化后的模型
对作为推理作业一部分提交的数据
执行推理。
4. 每个提交的作业都可以在 AI Hub 门户中查看。完成的编译作业会提供优化后模型的下载链接,随后可将其部署到本地开发设备,例如 Qualcomm Dragonwing™ RB3 Gen 2。
以下示例取自 [AI Hub 文档](https://workbench.aihub.qualcomm.com/docs/),它将 PyTorch 中的预训练 MobileNet V2 模型上传到 AI Hub,并将其编译为针对 Qualcomm Dragonwing™ RB3 Gen 2 优化的 LiteRT 模型。
```python theme={null}
import qai_hub as hub
import torch
from torchvision.models import mobilenet_v2
import numpy as np
# Using pre-trained MobileNet
torch_model = mobilenet_v2(pretrained=True)
torch_model.eval()
# Trace model (for on-device deployment)
input_shape = (1, 3, 224, 224)
example_input = torch.rand(input_shape)
traced_torch_model = torch.jit.trace(torch_model, example_input)
# Compile and optimize the model for a specific device
compile_job = hub.submit_compile_job(
model=traced_torch_model,
device=hub.Device("Dragonwing RB3 Gen 2 Vision Kit"),
input_specs=dict(image=input_shape),
#compile_options="--target_runtime tflite",
)
# Profiling Job
profile_job = hub.submit_profile_job(
model=compile_job.get_target_model(),
device=hub.Device("Dragonwing RB3 Gen 2 Vision Kit"),
)
sample = np.random.random((1, 3, 224, 224)).astype(np.float32)
# Inference Job
inference_job = hub.submit_inference_job(
model=compile_job.get_target_model(),
device=hub.Device("Dragonwing RB3 Gen 2 Vision Kit"),
inputs=dict(image=[sample]),
)
# Download model
compile_job.download_target_model(filename="/tmp/mobilenetv2.tflite")
```
要停用先前激活的 `qai_hub` 环境,请使用以下命令。
```shell theme={null}
conda deactivate
```
模型下载完成后即可部署。有关后续步骤,请参阅[运行推理](../map/use-available-frameworks-and-runtimes)。
有关 AI Hub 工作流和 API 的更多详细信息,请参阅 [AI Hub 文档](https://workbench.aihub.qualcomm.com/docs/hub/index.html#examples)、
浏览 [AI Hub 教程视频](https://www.youtube.com/watch?v=V1CDWYZ7Shw\&list=PLxeazpXYyqtOowtUdvigvAgMV5_K1KIrh),
或观看以下关于如何在 AI Hub 中分析模型性能的视频。