> ## Documentation Index
> Fetch the complete documentation index at: https://dragonwingdocs-staging.qualcomm.com/llms.txt
> Use this file to discover all available pages before exploring further.
# 部署 LiteRT 模型
> 使用 label_image 示例应用程序、C++ API 或 Qualcomm IM SDK 部署 LiteRT 模型。
您可以使用预编译的 `label_image` 示例应用程序、LiteRT C++ API 或 Qualcomm IM SDK 的 `gst-ai-classification` 管道,在 Qualcomm 开发套件上运行 LiteRT 模型。
部署之前,请确保您已完成[前提条件和模型设置](../topic/benchmark-a-litert-model#prerequisites)。
## 作为原生应用程序部署
`label_image` 示例应用程序是 TensorFlow 仓库的一部分,与 LiteRT 库交叉编译并安装在目标设备上。它加载一个分类 LiteRT 模型,并使用委托(delegate)对图像执行推理。
**使用 XNNPACK 委托在 CPU 上运行:**
```shell theme={null}
label_image -l ${HOME}/artifacts/labels.txt \
-i ${HOME}/artifacts/grace_hopper.bmp \
-m ${HOME}/artifacts/mobilenet_v1_1.0_224_quant.tflite \
-c 10 \
-p 1 \
--xnnpack_delegate 1
```
**使用 GPU 委托在 GPU 上运行:**
```shell theme={null}
label_image -l ${HOME}/artifacts/labels.txt \
-i ${HOME}/artifacts/grace_hopper.bmp \
-m ${HOME}/artifacts/mobilenet_v1_1.0_224.tflite \
-c 10 \
-p 1 \
--gl_backend 1
```
有关源代码,请参阅 TensorFlow GitHub 仓库中的 [label\_image 示例](https://github.com/tensorflow/tensorflow/tree/master/tensorflow/lite/examples/label_image)。
## 作为 C++ 应用程序部署
下图显示了创建 C++ 应用程序以运行 LiteRT 模型所涉及的步骤:
 ### 加载 LiteRT 模型
LiteRT 模型是一个 FlatBuffers 文件,包含模型算子、权重和偏置。使用以下 API 加载模型以进行推理:
```cpp theme={null}
#include
#include
#include "tensorflow/lite/interpreter.h"
#include "tensorflow/lite/kernels/register.h"
#include "tensorflow/lite/model.h"
#include "tensorflow/lite/optional_debug_tools.h"
std::unique_ptr model;
model = tflite::FlatBufferModel::BuildFromFile(model_name.c_str());
if (!model) {
std::cerr << "Failed to mmap model " << model_name << std::endl;
exit(-1);
}
```
### 创建 LiteRT 解释器
解释器在选定的委托上配置模型执行,并为前向传播分配内存:
```cpp theme={null}
tflite::ops::builtin::BuiltinOpResolver resolver;
tflite::InterpreterBuilder builder(*model, resolver);
std::unique_ptr interpreter;
builder(&interpreter);
if (!interpreter) {
std::cerr << "Failed to construct interpreter on provided tflite model" << std::endl;
}
if (interpreter->AllocateTensors() != kTfLiteOk) {
std::cerr << "Failed to allocate tensors!" << std::endl;
exit(-1);
}
```
### 使用委托准备模型
以下示例创建 XNNPACK 委托,用于在 Arm® CPU 上运行 LiteRT 模型:
```cpp theme={null}
TfLiteXNNPackDelegateOptions xnnpack_options = TfLiteXNNPackDelegateOptionsDefault();
xnnpack_options.num_threads = num_threads;
TfLiteDelegate* xnnpack_delegate = TfLiteXNNPackDelegateCreate(&xnnpack_options);
if (interpreter->ModifyGraphWithDelegate(xnnpack_delegate) != kTfLiteOk) {
// Report error and fall back to another delegate, or the default backend
}
```
### 准备输入/输出缓冲区
运行推理之前,请对输入数据(例如摄像头帧)进行预处理,使其符合模型期望的格式。常见的预处理步骤包括:
* 将输入图像调整为模型期望的分辨率
* 归一化
* 均值减除
### 运行推理
使用 `Invoke()` API 运行推理。完成后,从解释器中解析输出张量:
```cpp theme={null}
interpreter->Invoke();
```
有关完整示例,请参阅 [TensorFlow GitHub 仓库中的 label\_image 示例](https://github.com/tensorflow/tensorflow/tree/master/tensorflow/lite/examples/label_image)。
有关更多信息,请参阅 [LiteRT 文档](https://ai.google.dev/edge/litert)。
## 使用 Qualcomm IM SDK 部署
`gst-ai-classification` 示例应用程序使用 Qualcomm IM SDK 插件,在具备硬件加速的 Qualcomm 开发套件上运行 LiteRT 分类模型。
该管道从摄像头接收视频流,执行预处理,在 AI 硬件上运行推理,并显示结果:
### 加载 LiteRT 模型
LiteRT 模型是一个 FlatBuffers 文件,包含模型算子、权重和偏置。使用以下 API 加载模型以进行推理:
```cpp theme={null}
#include
#include
#include "tensorflow/lite/interpreter.h"
#include "tensorflow/lite/kernels/register.h"
#include "tensorflow/lite/model.h"
#include "tensorflow/lite/optional_debug_tools.h"
std::unique_ptr model;
model = tflite::FlatBufferModel::BuildFromFile(model_name.c_str());
if (!model) {
std::cerr << "Failed to mmap model " << model_name << std::endl;
exit(-1);
}
```
### 创建 LiteRT 解释器
解释器在选定的委托上配置模型执行,并为前向传播分配内存:
```cpp theme={null}
tflite::ops::builtin::BuiltinOpResolver resolver;
tflite::InterpreterBuilder builder(*model, resolver);
std::unique_ptr interpreter;
builder(&interpreter);
if (!interpreter) {
std::cerr << "Failed to construct interpreter on provided tflite model" << std::endl;
}
if (interpreter->AllocateTensors() != kTfLiteOk) {
std::cerr << "Failed to allocate tensors!" << std::endl;
exit(-1);
}
```
### 使用委托准备模型
以下示例创建 XNNPACK 委托,用于在 Arm® CPU 上运行 LiteRT 模型:
```cpp theme={null}
TfLiteXNNPackDelegateOptions xnnpack_options = TfLiteXNNPackDelegateOptionsDefault();
xnnpack_options.num_threads = num_threads;
TfLiteDelegate* xnnpack_delegate = TfLiteXNNPackDelegateCreate(&xnnpack_options);
if (interpreter->ModifyGraphWithDelegate(xnnpack_delegate) != kTfLiteOk) {
// Report error and fall back to another delegate, or the default backend
}
```
### 准备输入/输出缓冲区
运行推理之前,请对输入数据(例如摄像头帧)进行预处理,使其符合模型期望的格式。常见的预处理步骤包括:
* 将输入图像调整为模型期望的分辨率
* 归一化
* 均值减除
### 运行推理
使用 `Invoke()` API 运行推理。完成后,从解释器中解析输出张量:
```cpp theme={null}
interpreter->Invoke();
```
有关完整示例,请参阅 [TensorFlow GitHub 仓库中的 label\_image 示例](https://github.com/tensorflow/tensorflow/tree/master/tensorflow/lite/examples/label_image)。
有关更多信息,请参阅 [LiteRT 文档](https://ai.google.dev/edge/litert)。
## 使用 Qualcomm IM SDK 部署
`gst-ai-classification` 示例应用程序使用 Qualcomm IM SDK 插件,在具备硬件加速的 Qualcomm 开发套件上运行 LiteRT 分类模型。
该管道从摄像头接收视频流,执行预处理,在 AI 硬件上运行推理,并显示结果:
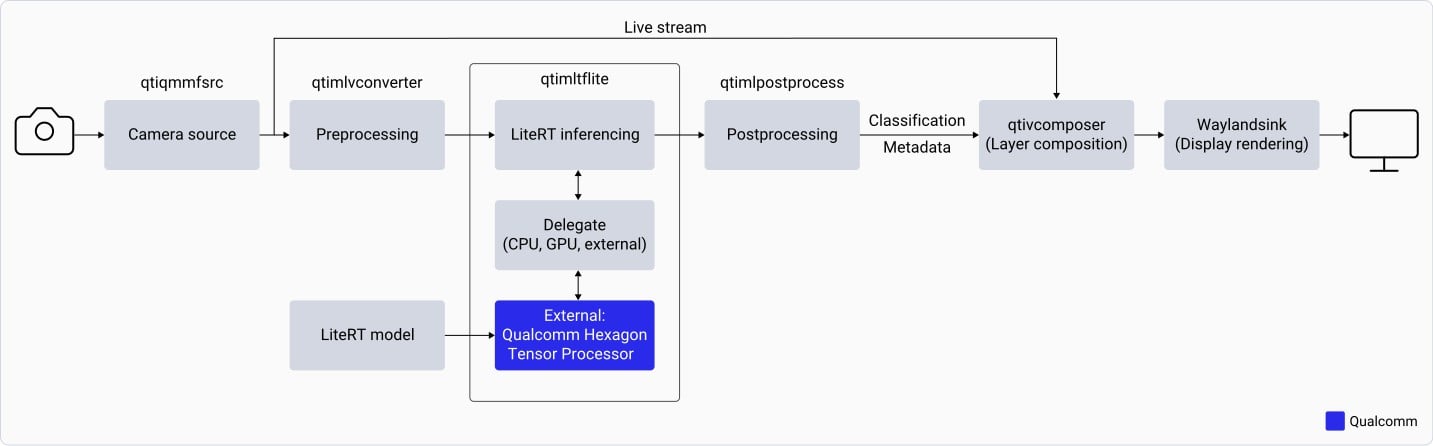 `gst-ai-classification` 应用程序会:
1. 以指定的分辨率和帧率(例如 1080p、30 fps)打开 IMX577 摄像头。
2. 对每个摄像头帧进行预处理——缩小到 224×224,并根据模型要求进行归一化。
3. 加载 LiteRT 分类模型,并使用 `qtimltflite` 插件运行推理。
4. 从输出张量中提取预测概率最高的标签。
5. 将推理结果叠加在原始摄像头帧上,并显示在连接的显示器上。
`IQ-2390` 不支持 `camera` 用例。
### 下载模型和标签文件
访问 [Qualcomm AI Hub](https://aihub.qualcomm.com/models/inception_v3?searchTerm=ince\&chipsets=qualcomm-qcs6490-proxy),下载 Inception-v3 量化模型。
```shell theme={null}
curl -L -O https://raw.githubusercontent.com/qualcomm/sample-apps-for-qualcomm-linux/refs/heads/main/artifacts/json_labels/classification.json
```
```shell theme={null}
ssh root@
```
```shell theme={null}
mkdir -p ${HOME}/Downloads/qimsdk_samples/models ${HOME}/Downloads/qimsdk_samples/labels ${HOME}/Downloads/qimsdk_samples/media
```
```shell theme={null}
exit
```
```shell theme={null}
scp classification.json root@:~/Downloads/qimsdk_samples/labels
```
```shell theme={null}
scp inception_v3-inception-v3-w8a8.tflite root@:~/Downloads/qimsdk_samples/models/inception_v3_quantized.tflite
```
### 运行示例应用程序
```shell theme={null}
ssh root@
```
将[视频文件](https://github.com/qualcomm/sample-apps-for-qualcomm-linux/raw/refs/heads/main/qualcomm-linux/artifacts/videos/video.mp4)下载到设备上的 `/etc/media/video.mp4`:
```shell theme={null}
wget -O ${HOME}/Downloads/qimsdk_samples/media/video.mp4 https://github.com/qualcomm/sample-apps-for-qualcomm-linux/raw/refs/heads/main/qualcomm-linux/artifacts/videos/video.mp4
```
```shell theme={null}
gst-ai-classification --config-file=/etc/configs/config_classification.json
```
此命令使用 `/etc/configs/config_classification.json` 中的示例配置运行应用程序。
要停止应用程序,请按 `Ctrl+C`。
您可以通过 `--config-file` 指定路径来使用自定义配置文件:
```bash theme={null}
gst-ai-classification --config-file=/path/to/config_classification.json
```
如果指定了 `--config-file`,应用程序将使用该文件。否则,它将按以下顺序搜索 `config_classification.json`:
| 优先级 | 位置 | 说明 |
| :-: | :- | :- |
| 1 | 通过 `--config-file` 提供的路径。 | 使用命令行中指定的配置文件。 |
| 2 | `$XDG_CONFIG_HOME/qimsdk_samples/config_classification.json` | 设置了该环境变量时,使用用户定义的配置目录。 |
| 3 | `$HOME/.config/qimsdk_samples/config_classification.json` | 在 `XDG_CONFIG_HOME` 中未找到文件时,使用默认的用户配置目录。 |
| 4 | `/etc/configs/config_classification.json` | 使用系统级配置文件作为最终回退。 |
要创建用户专属配置,请将示例文件复制到用户配置目录:
```bash theme={null}
export XDG_CONFIG_HOME="$HOME/.config"
mkdir -p "$XDG_CONFIG_HOME/qimsdk_samples"
cp /etc/configs/config_classification.json "$XDG_CONFIG_HOME/qimsdk_samples/config_classification.json"
```
要查看可用的命令行选项,请运行:
```bash theme={null}
gst-ai-classification -h
```
编辑 `config_classification.json` 配置文件:
```json theme={null}
{
"file-path": "video.mp4",
"ml-framework": "tflite",
"model": "inception_v3_quantized.tflite",
"labels": "classification.json",
"threshold": 40,
"runtime": "dsp",
"output-type": "waylandsink"
}
```
应用程序使用 `$HOME/Downloads/qimsdk_samples` 作为其构件目录。指定相对路径或文件名时,会相对于下方对应的子目录进行解析。绝对路径则按原样使用。
| 配置字段 | 相对路径的解析结果 |
| :- | :- |
| `file-path` | `$HOME/Downloads/qimsdk_samples/media/video.mp4` |
| `model` | `$HOME/Downloads/qimsdk_samples/models/inception_v3_quantized.tflite` |
| `labels` | `$HOME/Downloads/qimsdk_samples/labels/classification.json` |
运行应用程序:
```bash theme={null}
gst-ai-classification
```
运行时,应用程序会在连接的显示器上显示视频流,并在每一帧上叠加推理结果。
`gst-ai-classification` 应用程序会:
1. 以指定的分辨率和帧率(例如 1080p、30 fps)打开 IMX577 摄像头。
2. 对每个摄像头帧进行预处理——缩小到 224×224,并根据模型要求进行归一化。
3. 加载 LiteRT 分类模型,并使用 `qtimltflite` 插件运行推理。
4. 从输出张量中提取预测概率最高的标签。
5. 将推理结果叠加在原始摄像头帧上,并显示在连接的显示器上。
`IQ-2390` 不支持 `camera` 用例。
### 下载模型和标签文件
访问 [Qualcomm AI Hub](https://aihub.qualcomm.com/models/inception_v3?searchTerm=ince\&chipsets=qualcomm-qcs6490-proxy),下载 Inception-v3 量化模型。
```shell theme={null}
curl -L -O https://raw.githubusercontent.com/qualcomm/sample-apps-for-qualcomm-linux/refs/heads/main/artifacts/json_labels/classification.json
```
```shell theme={null}
ssh root@
```
```shell theme={null}
mkdir -p ${HOME}/Downloads/qimsdk_samples/models ${HOME}/Downloads/qimsdk_samples/labels ${HOME}/Downloads/qimsdk_samples/media
```
```shell theme={null}
exit
```
```shell theme={null}
scp classification.json root@:~/Downloads/qimsdk_samples/labels
```
```shell theme={null}
scp inception_v3-inception-v3-w8a8.tflite root@:~/Downloads/qimsdk_samples/models/inception_v3_quantized.tflite
```
### 运行示例应用程序
```shell theme={null}
ssh root@
```
将[视频文件](https://github.com/qualcomm/sample-apps-for-qualcomm-linux/raw/refs/heads/main/qualcomm-linux/artifacts/videos/video.mp4)下载到设备上的 `/etc/media/video.mp4`:
```shell theme={null}
wget -O ${HOME}/Downloads/qimsdk_samples/media/video.mp4 https://github.com/qualcomm/sample-apps-for-qualcomm-linux/raw/refs/heads/main/qualcomm-linux/artifacts/videos/video.mp4
```
```shell theme={null}
gst-ai-classification --config-file=/etc/configs/config_classification.json
```
此命令使用 `/etc/configs/config_classification.json` 中的示例配置运行应用程序。
要停止应用程序,请按 `Ctrl+C`。
您可以通过 `--config-file` 指定路径来使用自定义配置文件:
```bash theme={null}
gst-ai-classification --config-file=/path/to/config_classification.json
```
如果指定了 `--config-file`,应用程序将使用该文件。否则,它将按以下顺序搜索 `config_classification.json`:
| 优先级 | 位置 | 说明 |
| :-: | :- | :- |
| 1 | 通过 `--config-file` 提供的路径。 | 使用命令行中指定的配置文件。 |
| 2 | `$XDG_CONFIG_HOME/qimsdk_samples/config_classification.json` | 设置了该环境变量时,使用用户定义的配置目录。 |
| 3 | `$HOME/.config/qimsdk_samples/config_classification.json` | 在 `XDG_CONFIG_HOME` 中未找到文件时,使用默认的用户配置目录。 |
| 4 | `/etc/configs/config_classification.json` | 使用系统级配置文件作为最终回退。 |
要创建用户专属配置,请将示例文件复制到用户配置目录:
```bash theme={null}
export XDG_CONFIG_HOME="$HOME/.config"
mkdir -p "$XDG_CONFIG_HOME/qimsdk_samples"
cp /etc/configs/config_classification.json "$XDG_CONFIG_HOME/qimsdk_samples/config_classification.json"
```
要查看可用的命令行选项,请运行:
```bash theme={null}
gst-ai-classification -h
```
编辑 `config_classification.json` 配置文件:
```json theme={null}
{
"file-path": "video.mp4",
"ml-framework": "tflite",
"model": "inception_v3_quantized.tflite",
"labels": "classification.json",
"threshold": 40,
"runtime": "dsp",
"output-type": "waylandsink"
}
```
应用程序使用 `$HOME/Downloads/qimsdk_samples` 作为其构件目录。指定相对路径或文件名时,会相对于下方对应的子目录进行解析。绝对路径则按原样使用。
| 配置字段 | 相对路径的解析结果 |
| :- | :- |
| `file-path` | `$HOME/Downloads/qimsdk_samples/media/video.mp4` |
| `model` | `$HOME/Downloads/qimsdk_samples/models/inception_v3_quantized.tflite` |
| `labels` | `$HOME/Downloads/qimsdk_samples/labels/classification.json` |
运行应用程序:
```bash theme={null}
gst-ai-classification
```
运行时,应用程序会在连接的显示器上显示视频流,并在每一帧上叠加推理结果。