> ## Documentation Index
> Fetch the complete documentation index at: https://dragonwingdocs-staging.qualcomm.com/llms.txt
> Use this file to discover all available pages before exploring further.

# IQ-9075

<Note>
  For supported interfaces and capabilities, see [IQ-9075 display specifications](display-specs-iq9075).
</Note>

<Tabs>
  <Tab title="DisplayPort setup">
    ## Set up the DisplayPort

    The display subsystem provides the Weston and Wayland compositors, along with `libdrm`, which interact with the DPU driver to render the Wayland client applications. Use the sample test applications to evaluate the basic rendering of the Wayland applications and to connect to the DisplayPort.

    <div className="flex flex-col items-center gap-2">
      <img src="https://mintcdn.com/qualcomm-staging/blZpKs_b9On5nj-y/archives/2.1/Technologies/Display/media/qli-display/set_up_DP_colourchange.svg?fit=max&auto=format&n=blZpKs_b9On5nj-y&q=85&s=0a7dc1feb1a2ef9f98cfb6fa716b362b" alt="Figure: DisplayPort setup workflow" width="1122" height="212" data-path="archives/2.1/Technologies/Display/media/qli-display/set_up_DP_colourchange.svg" />

      <p className="text-sm text-gray-700">**Figure: DisplayPort setup workflow**</p>
    </div>

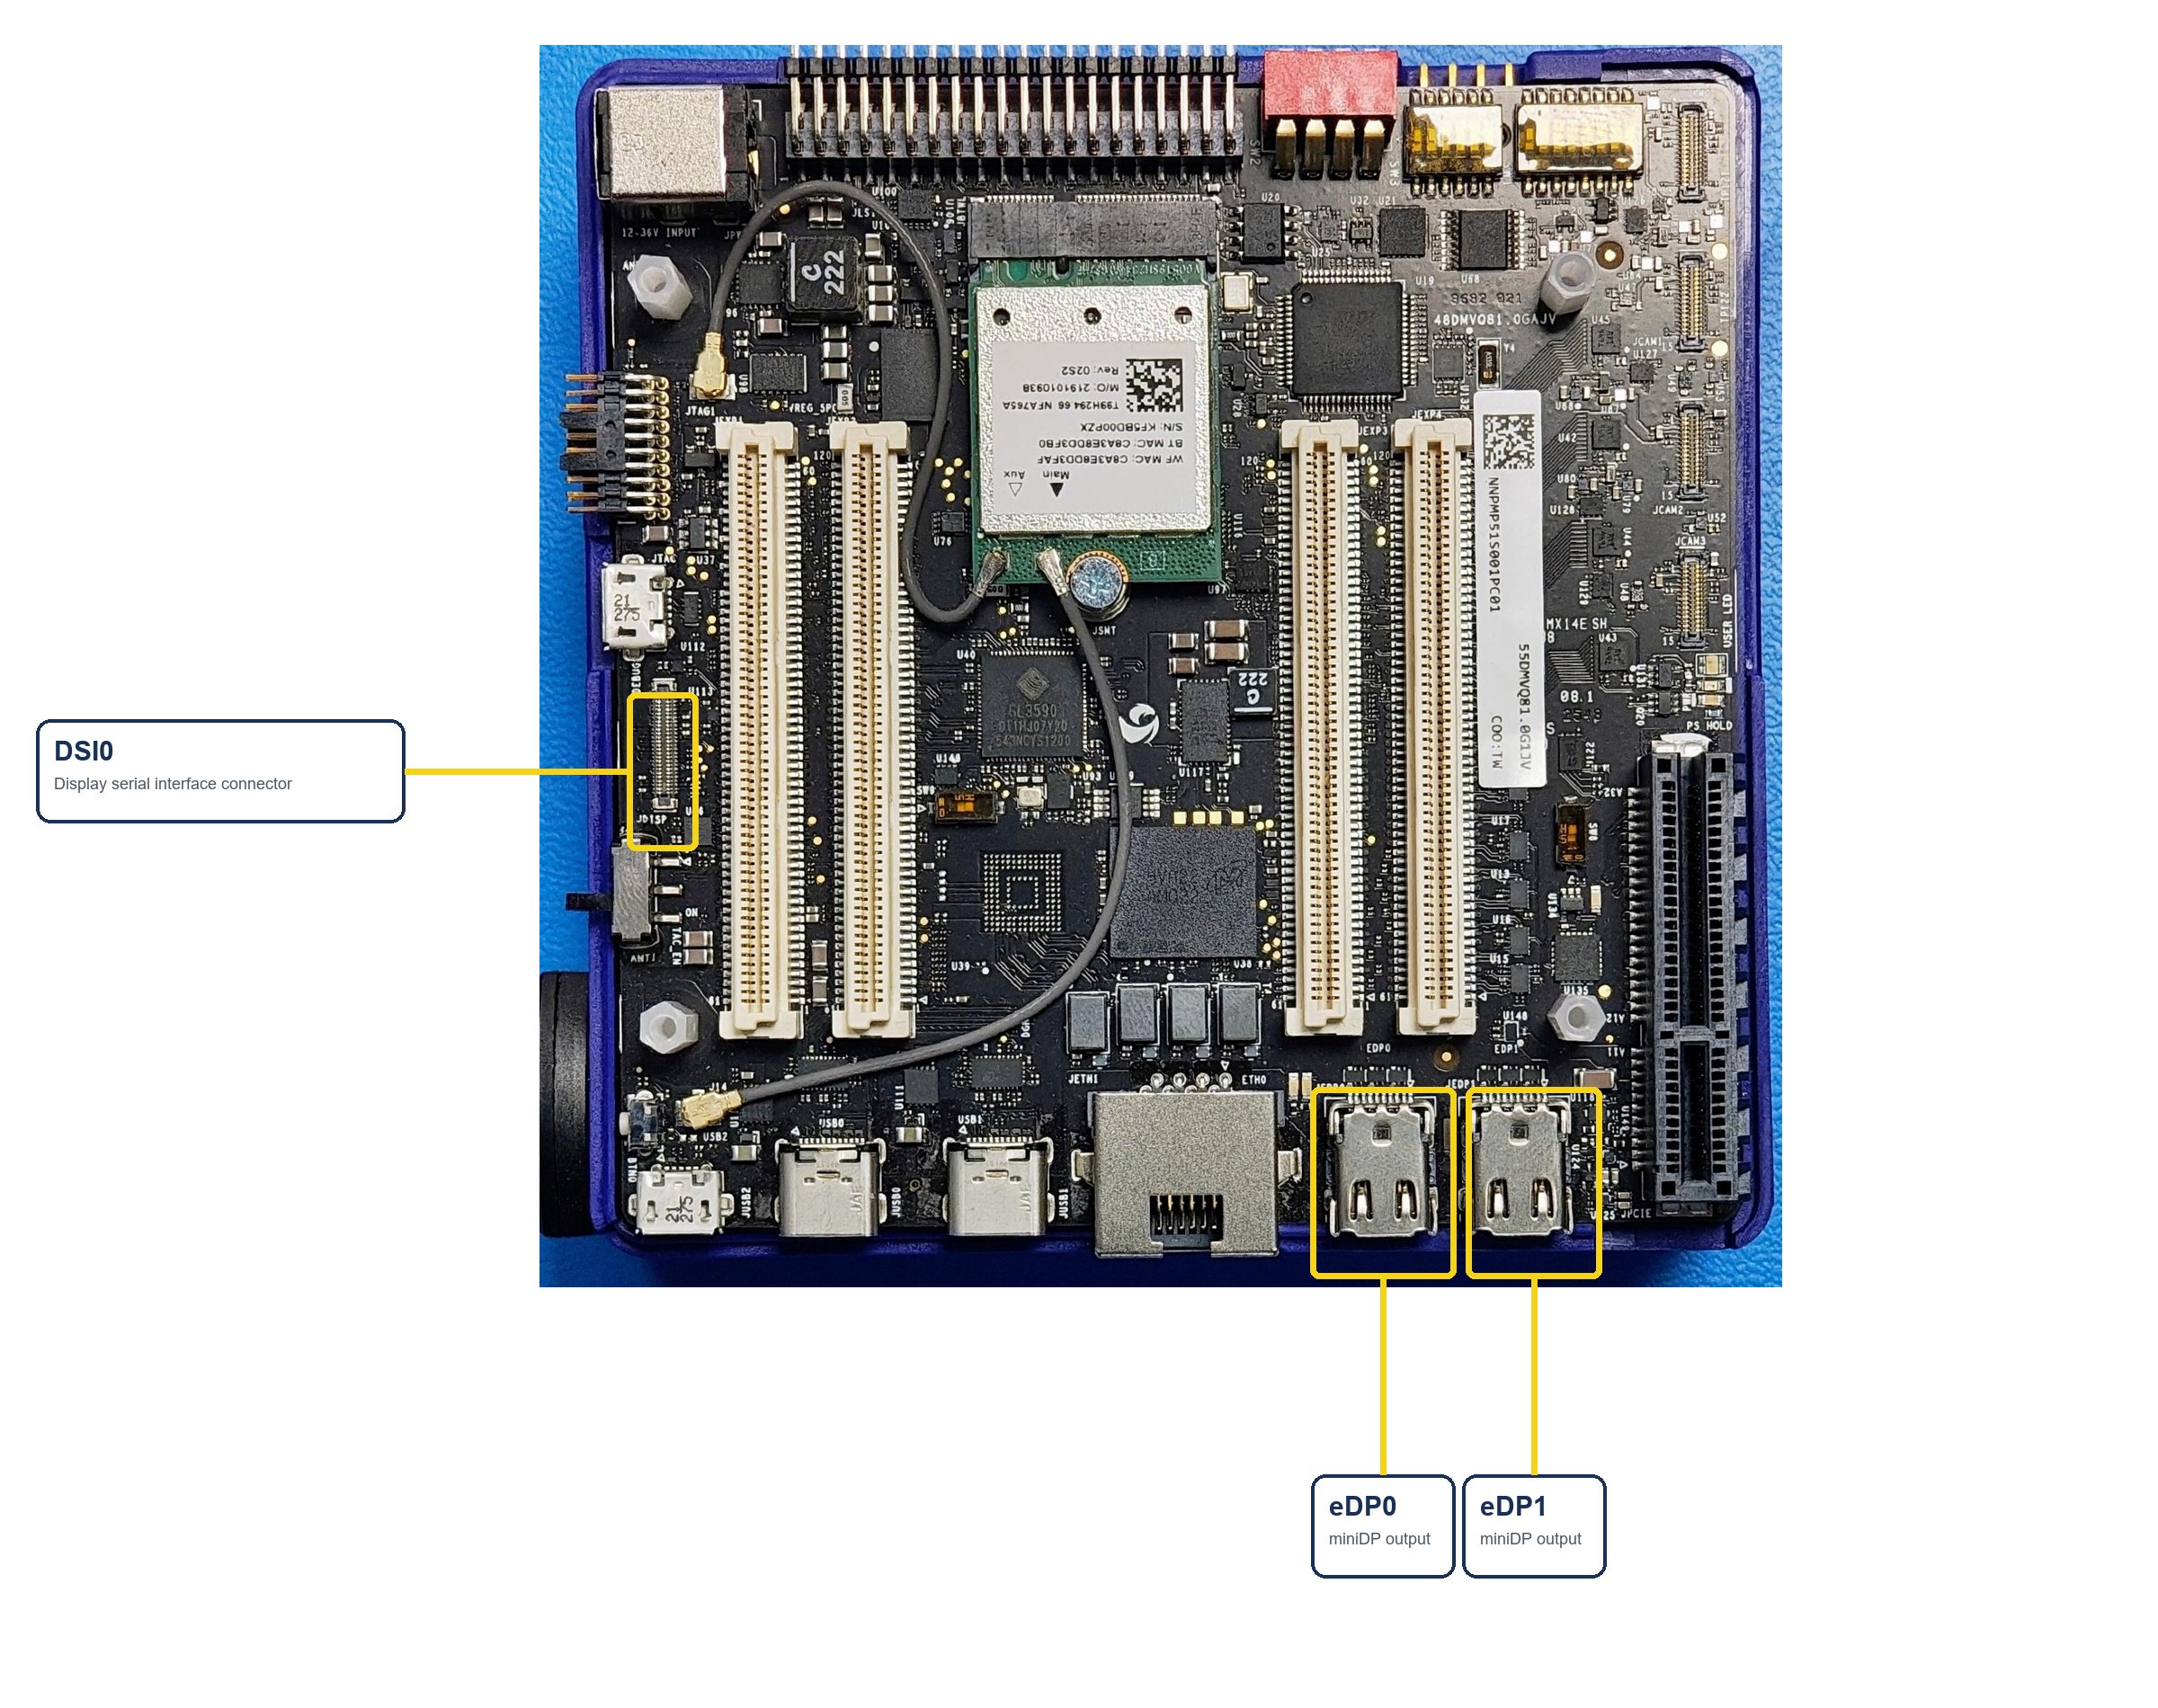
    The following figure shows the display connectors on the IQ-9075 EVK.

    <div className="flex flex-col items-center gap-2">
      <img src="https://mintcdn.com/qualcomm-staging/blZpKs_b9On5nj-y/archives/2.1/Technologies/Display/media/qli-display/qcs9075-top-view-display-connectors.jpg?fit=max&auto=format&n=blZpKs_b9On5nj-y&q=85&s=090f9741016ddceaf201d514cc434d3b" alt="IQ-9075 EVK display connectors" width="2400" height="1900" data-path="archives/2.1/Technologies/Display/media/qli-display/qcs9075-top-view-display-connectors.jpg" />

      <p className="text-sm text-gray-700">**Figure: IQ-9075 EVK display connectors**</p>
    </div>

    ### Verify the DisplayPort setup

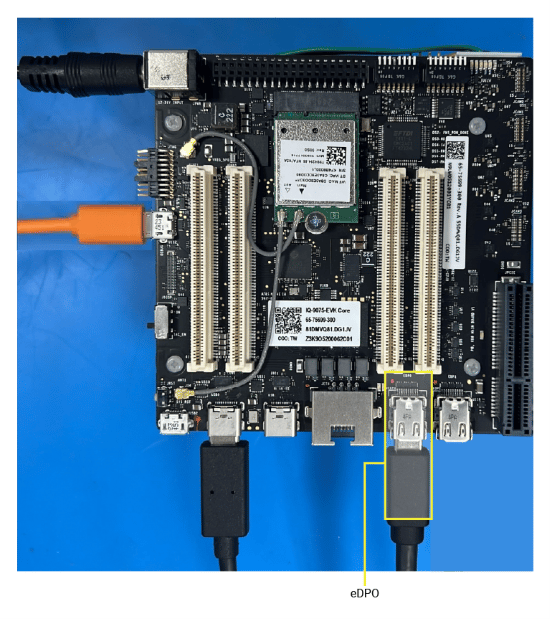
    1. Connect the DisplayPort cable to the eDP0 connector as shown in the following figure:

           <div className="flex flex-col items-center gap-2">
             <img src="https://mintcdn.com/qualcomm-staging/blZpKs_b9On5nj-y/archives/2.1/Technologies/Display/media/qli-display/Lemans_dip_switch_and_rb8.png?fit=max&auto=format&n=blZpKs_b9On5nj-y&q=85&s=97eb5e9b3185286c2e36e5f99bdf605e" alt="Figure: DisplayPort setup" width="550" height="619" data-path="archives/2.1/Technologies/Display/media/qli-display/Lemans_dip_switch_and_rb8.png" />

             <p className="text-sm text-gray-700">**Figure: DisplayPort setup**</p>
           </div>

    2. Power on the device. Weston launches automatically during boot.

    3. Verify the display.

       The following Weston flower pattern displays on both DisplayPort screens, indicating successful setup.

           <div className="flex flex-col items-center gap-2">
             <img src="https://mintcdn.com/qualcomm-staging/blZpKs_b9On5nj-y/archives/2.1/Technologies/Display/media/qli-display/Weston_flower_pattern.PNG?fit=max&auto=format&n=blZpKs_b9On5nj-y&q=85&s=aab6390c7dc82fb02d4aacf92f7b32c9" alt="Figure: Weston flower pattern" width="680" height="376" data-path="archives/2.1/Technologies/Display/media/qli-display/Weston_flower_pattern.PNG" />
           </div>

    #### Set up multiple DisplayPort displays

    To connect and configure more than one DisplayPort display on the IQ-9075 EVK, use the multiple DisplayPort setup guide.

    <Note>
      For step-by-step instructions, see [Set up multiple DisplayPort displays](https://docs.qualcomm.com/doc/80-80025-18A/topic/setup_multiple_displayports.html).
    </Note>

    <br />

    <Note>
      If you are experiencing a no-display screen issue on DisplayPort, see [Debug the DisplayPort](troubleshoot-debug-dp-iq9075).
    </Note>
  </Tab>

  <Tab title="DSI setup">
    ## Set up the DSI display

    The display subsystem provides the Weston and Wayland compositors, along with `libdrm`, which interact with the DPU driver to render the Wayland client applications. Use the sample test applications to evaluate the basic rendering of the Wayland applications and to connect to the DSI display.

    <div className="flex flex-col items-center gap-2">
      <img src="https://mintcdn.com/qualcomm-staging/blZpKs_b9On5nj-y/archives/2.1/Technologies/Display/media/qli-display/dsi-display-validation-flow.png?fit=max&auto=format&n=blZpKs_b9On5nj-y&q=85&s=52e520e834dcf235e801163057c5d526" alt="DSI display setup workflow" width="1122" height="212" data-path="archives/2.1/Technologies/Display/media/qli-display/dsi-display-validation-flow.png" />

      <p className="text-sm text-gray-700">**Figure: DSI display setup workflow**</p>
    </div>

    The following figure shows the display connectors on the IQ-9075 EVK.

    <div className="flex flex-col items-center gap-2">
      <img src="https://mintcdn.com/qualcomm-staging/blZpKs_b9On5nj-y/archives/2.1/Technologies/Display/media/qli-display/qcs9075-top-view-display-connectors.jpg?fit=max&auto=format&n=blZpKs_b9On5nj-y&q=85&s=090f9741016ddceaf201d514cc434d3b" alt="IQ-9075 EVK display connectors" width="2400" height="1900" data-path="archives/2.1/Technologies/Display/media/qli-display/qcs9075-top-view-display-connectors.jpg" />

      <p className="text-sm text-gray-700">**Figure: IQ-9075 EVK display connectors**</p>
    </div>

    **The IQ-9075 EVK supports the reference Raspberry Pi (RPi) display panel on DSI0.**

    <Note>
      For step-by-step instructions to connect and set up the RPi display panel, see [Set up the Raspberry Pi display panel](https://docs.qualcomm.com/doc/80-80025-18A/topic/setup_rpi.html).
    </Note>
  </Tab>
</Tabs>

## Verify the display functionality

After you have set up the required display interface, run the following test applications to verify the display functionality:

<CardGroup cols={2}>
  <Card title="Run Weston simple EGL" icon="play" href="run-weston-simple-egl">
    Verify composition and rendering of frames on your display.
  </Card>

  <Card title="Run DRM modetest" icon="wrench" href="run-drm-modetest">
    Verify the display driver topology and DPU paths.
  </Card>
</CardGroup>