> ## Documentation Index
> Fetch the complete documentation index at: https://dragonwingdocs-staging.qualcomm.com/llms.txt
> Use this file to discover all available pages before exploring further.
# Advanced audio features
> Enable advanced audio features including echo cancellation, noise suppression, VoIP, and multi-device playback.
## **Minimize echo and noise**
Echo and noise problems are common in VoIP systems. Speech comes from the far-end speaker and echoes back with a time delay, causing perception problems. Echo cancellation decreases the echo from the far-end speaker during communication. Noise suppression decreases the noise from the microphone channel. The SMECNS echo cancellation and noise suppression (ECNS) algorithm provides stationary and nonstationary noise suppression and echo cancellation.
Acoustic echo is when echoes occur due to the acoustic path (acoustic coupling) between the loudspeaker and microphone of a device. It is important for hands-free and teleconferencing applications.
The following figure shows the acoustic echo path and how acoustic echo occurs between loudspeakers and microphones.
Noise and acoustic echo
Near-end speech signalFar-end speech signalNear-end speakerEnvironmental noiseAcoustic echo pathAcoustic echoNear-end speechFar-end speech
Noise and acoustic echo
* **Echo Canceller** – An adaptive filter that self-adjusts coefficients to cancel out echo. Every echo has an echo path, and is characterized by an impulse response. The echo canceller adapts to the network echo path such that it cancels out the echo.
* **Noise Suppression** – Single mic echo canceller and noise suppressor (SMECNS) helps to suppress the surrounding stationary noise when using devices in noisy locations.
### **Enable SMECNS for recording**
When recording, SMECNS keeps speech quality in the recording path by suppressing background noise captured by the microphone.
For single-microphone recordings, only stationary noise suppression is possible. Stationary noise is where the frequency does not change over time, for example, road noise or white noise.
The following figure shows how gains, SMECNS, and postprocessing modules are used to remove outside noise and echo to output clean speech.
SMECNS software block for recording
SMECNS software block for recording
To enable the SMECNS in the recording path:
1. Use the `wpctl status` command to list available nodes.
```text theme={null}
systemctl stop pipewire wireplumber pipewire.socket pipewire-manager.socket
```
```text theme={null}
chmod 777 /dev/dma_heap/system
```
```text theme={null}
systemctl start pipewire wireplumber
```
```text theme={null}
wpctl status
```
2. Run `wpctl set-default` to set the source node to the handset mic.
```text theme={null}
wpctl set-default
```
3. Run `pw-record` to start recording. The following example runs in verbose mode and saves the recording to `/opt/test.wav`.
```text theme={null}
pw-record /opt/test.wav -v
```
### **Simulate VoIP**
To simulate VoIP using PipeWire:
| **Set record source** | |
| :- | :- |
```text theme={null}
pw-record /opt/record_voip.wav -v --target=voip-tx0
```
| **Set playback sink** | |
| :- | :- |
```text theme={null}
pw-play /opt/test.wav -v --target=voip-rx0
```
Be sure to push a PCM file (`.wav`) to the `/opt/` folder.
### **Enable single stream multiple device playback**
Configure the platform to render a single audio stream simultaneously on multiple output devices, such as a built-in speaker and a wired headset. In this mode, the audio is duplicated and the same decoded audio stream is routed to multiple active output devices concurrently, ensuring synchronized playback across all selected endpoints.
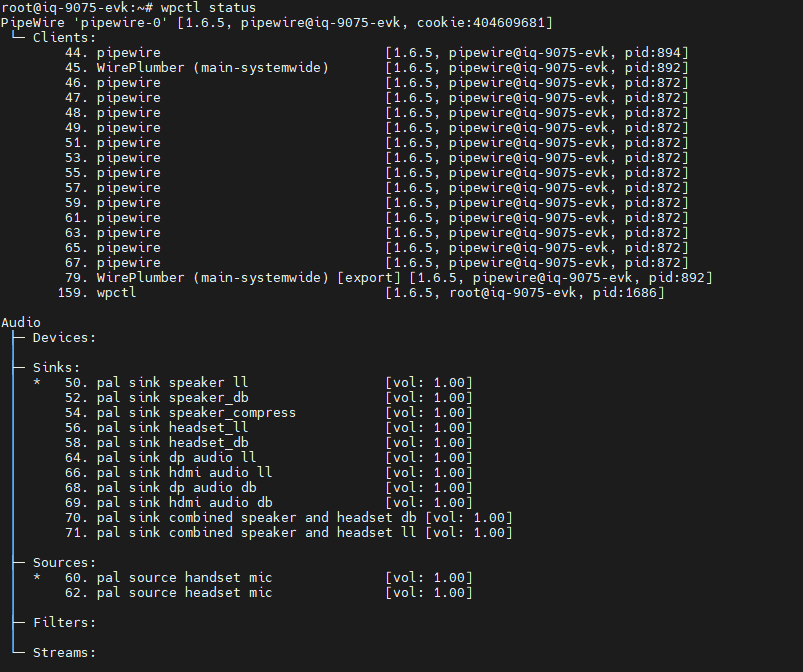
1. List available audio nodes.
```text theme={null}
wpctl status
```
wpctl status output showing available PAL sink and source nodes
2. Set the default node.
```text theme={null}
wpctl set-default
```
* For Low Latency, choose the node with `pal sink combined speaker and headset ll`.
* For Deep buffer, choose the node with `pal sink combined speaker and headset db`.
3. Start playback.
```text theme={null}
pw-play /tmp/yesterday_48KHz.wav -v
```
### **Enable multiple stream multiple device playback**
Configure the platform to render multiple independent audio streams simultaneously on different output devices, such as a built-in speaker and a wired headset. In this mode, each audio stream is managed and routed independently, allowing distinct streams to be delivered concurrently to separate output devices without interference. This enables use cases such as parallel media playback and notification routing across multiple endpoints.
1. List available audio nodes.
```text theme={null}
pw-cli ls Node
```
2. Select the audio nodes where you want your multiple streams to play and specify those node names using the `--target` command-line option.
3. Start low latency playback.
```text theme={null}
pw-play --target=pal_sink_speaker_ll /opt/clip1.wav -v
```
```text theme={null}
pw-play --target=pal_sink_headset_ll /opt/clip2.wav -v
```
### **Dynamic device switch using PipeWire**
Use `wpctl` to trigger a dynamic device switch while audio is active.
1. List all available audio nodes.
```text theme={null}
wpctl status
```
2. Start playback on the default device (for example, speaker).
```text theme={null}
pw-play /opt/test.wav -v
```
3. While playback is active, switch to a different output device (for example, headset) by setting a new default sink.
```text theme={null}
wpctl set-default
```
WirePlumber re-routes the stream and PAL performs the device switch seamlessly.
## **Enable DP and HDMI audio**
This section applies to QCS6490 (Kodiak) and IQ-9075 (Lemans) platforms (config1).
### **Set up QCS6490 (rb3-gen2-core-kit)**
1. Copy the topology binary to the firmware path.
```text theme={null}
cp \\sphere\CasaBuilds\QLI\Topology\QCS6490\QCS6490-RB3Gen2-tplg.bin /lib/firmware/qcom/qcs6490/
```
2. Copy the HiFi configuration file.
```text theme={null}
cp \\sphere\CasaBuilds\QLI\Topology\QCS6490\HiFi.conf.kodiak /usr/share/alsa/ucm2/Qualcomm/qcs6490/QCS6490-RB3Gen2/HiFi.conf
```
3. Copy the HDMI format configuration file.
```text theme={null}
cp \\sphere\CasaBuilds\QLI\Topology\QCS6490\51-hdmi-format.conf /usr/share/wireplumber.conf.d/51-hdmi-format.conf
```
4. Reboot the device. On boot, ensure DP is connected (typeC to HDMI female + HDMI to HDMI cable).
```text theme={null}
reboot
```
**HDMI and DP audio playback (QCS6490)**
| HDMI audio playback | DP audio playback |
| :- | :- |
| `amixer -c 0 cset iface=MIXER,name='SECONDARY_MI2S_RX Audio Mixer MultiMedia3' 1` | `amixer -c 0 cset iface=MIXER,name='DISPLAY_PORT_RX_0 Audio Mixer MultiMedia4' 1` |
| `aplay -D plughw:0,2 /home/test.wav` | `aplay -D plughw:0,3 /home/test.wav` |
| `wpctl set-default ` | `wpctl set-default ` |
| `pw-play -v /home/test.wav` | `pw-play -v /home/test.wav` |
### **Set up IQ-9075 (iq-9075-evk)**
1. Copy the topology binary to the firmware path.
```text theme={null}
cp \\sphere\CasaBuilds\QLI\Topology\IQ-9075\LEMANS-EVK-tplg.bin /lib/firmware/qcom/sa8775p/
```
2. Copy the HiFi configuration file.
```text theme={null}
cp \\sphere\CasaBuilds\QLI\Topology\IQ-9075\HiFi.conf.lemans /usr/share/alsa/ucm2/Qualcomm/sa8775p/lemans-evk/HiFi.conf
```
3. Reboot the device. On boot, ensure DP is connected (eDP to DP cable).
```text theme={null}
reboot
```
**DP audio playback (IQ-9075)**
| DP audio playback |
| :- |
| `amixer -c 0 cset iface=MIXER,name='DISPLAY_PORT_RX_0 Audio Mixer MultiMedia3' 1` |
| `aplay -D plughw:0,2 /home/test.wav` |
| `wpctl set-default ` |
| `pw-play -v /home/test.wav` |
## **Set up and validate Shikra audio (Config 1 and Config 2)**
This section documents Shikra audio validation procedures for CQS, CQM, and IQS form factors across Config 1 and Config 2.
Replace placeholders such as `` and `.wav` with values for your setup.
### **Config 1 validation**
Config 1 uses ALSA-based playback and record validation with topology binaries and mixer commands.
#### **Form factor mapping**
| **Form factor** | **Topology binary** | **Playback device** | **Record device** |
| :- | :- | :- | :- |
| CQS | `shikra-cqs-evk-tplg.bin` | `plughw:0,0` | `plughw:0,2` |
| CQM | No topology copy required | `plughw:0,2` | `plughw:0,3` |
| IQS | `shikra-iqs-evk-tplg.bin` | `plughw:0,0` | `plughw:0,2` |
#### **Host preparation**
```text theme={null}
sudo apt update
sudo apt install -y wget
wget https://raw.githubusercontent.com/AudioReach/audioreach-conf/master/qcom/qli/SHIKRA_CQS/shikra-cqs-evk-tplg.bin
wget https://raw.githubusercontent.com/AudioReach/audioreach-conf/master/qcom/qli/SHIKRA_IQS/shikra-iqs-evk-tplg.bin
```
#### **CQS validation**
Use this flow for the CQS form factor, including topology transfer, audio file copy, target verification, reboot, playback, and record validation.
**Setup and file transfer**
```text theme={null}
scp shikra-cqs-evk-tplg.bin root@:/lib/firmware/qcom/shikra/
scp .wav root@:/usr/
ls -l /lib/firmware/qcom/shikra/
reboot
```
**Playback**
```text theme={null}
amixer -c 0 cset name='SECONDARY_TDM_RX_0 Audio Mixer MultiMedia1' 1
amixer -c 0 cset name='Rx Slot Mask' 3
amixer -c 0 cset name='Speaker Volume' 72
amixer -c 0 cset name='Usage Mode' 3
aplay -D plughw:0,0 -r 48000 -f S16_LE -c 2 /usr/.wav -vv
```
**Record**
```text theme={null}
amixer -c 0 cset iface=MIXER,name='VA DEC0 MUX' 'VA_DMIC'
amixer -c 0 cset iface=MIXER,name='VA DMIC MUX0' 'DMIC0'
amixer -c 0 cset iface=MIXER,name='VA_AIF1_CAP Mixer DEC0' 1
amixer -c 0 cset iface=MIXER,name='VA_DEC0 Volume' 100
amixer -c 0 cset name='MultiMedia3 Mixer VA_CODEC_DMA_TX_0' 1
arecord -D plughw:0,2 -c 1 -d 10 -f S16_LE -r 48000 /tmp/rec.wav
```
#### **CQM validation**
Use this flow for the CQM form factor. This path requires the audio file copy but does not include a topology binary transfer.
**Setup and file transfer**
```text theme={null}
scp .wav root@:/usr/
```
**Playback**
```text theme={null}
amixer -c 0 cset name='Rx Slot Mask' 3
amixer -c 0 cset name='Speaker Volume' 72
amixer -c 0 cset name='Usage Mode' 3
aplay -D plughw:0,2 -r 48000 -f S16_LE -c 2 /usr/.wav
```
**Record**
```text theme={null}
amixer -c 0 cset iface=MIXER,name='VA DEC0 MUX' 'VA_DMIC'
amixer -c 0 cset iface=MIXER,name='VA DMIC MUX0' 'DMIC0'
amixer -c 0 cset iface=MIXER,name='VA_AIF1_CAP Mixer DEC0' 1
amixer -c 0 cset iface=MIXER,name='VA_DEC0 Volume' 100
arecord -D plughw:0,3 -c 1 -d 10 -f S16_LE -r 48000 /tmp/rec.wav
```
#### **IQS validation**
Use this flow for the IQS form factor, including topology transfer, audio file copy, target verification, reboot, remoteproc start, playback, and record validation.
**Setup and file transfer**
```text theme={null}
scp shikra-iqs-evk-tplg.bin root@:/lib/firmware/qcom/shikra/
scp .wav root@:/usr/
ls -l /lib/firmware/qcom/shikra/
reboot
echo start > /sys/class/remoteproc/remoteproc0/state
```
**Playback**
```text theme={null}
amixer -c 0 cset iface=MIXER,name='Left Speaker Mixer Left DAC Switch' on
amixer -c 0 cset iface=MIXER,name='Right Speaker Mixer Right DAC Switch' on
amixer -c 0 cset name='Speaker Left Switch' on
amixer -c 0 cset name='Speaker Right Switch' on
amixer -c 0 cset name='Speaker Switch' on
amixer -c 0 cset iface=MIXER,name='Speaker Volume' '10'
amixer -c 0 cset iface=MIXER,name='Speaker Left Mixer Volume' '3'
amixer -c 0 cset iface=MIXER,name='Speaker Right Mixer Volume' '3'
amixer -c 0 cset iface=MIXER,name='Speaker Switch' 1
amixer -c 0 cset iface=MIXER,name='Playback Path DC Blocking' 1
amixer -c 0 cset iface=MIXER,name='PRIMARY_MI2S_RX Audio Mixer MultiMedia1' 1
aplay -D plughw:0,0 -r 48000 -f S16_LE -c 2 /usr/.wav
```
**Record**
```text theme={null}
amixer -c 0 cset iface=MIXER,name='VA DEC0 MUX' 'VA_DMIC'
amixer -c 0 cset iface=MIXER,name='VA DMIC MUX0' 'DMIC0'
amixer -c 0 cset iface=MIXER,name='VA_AIF1_CAP Mixer DEC0' 1
amixer -c 0 cset iface=MIXER,name='VA_DEC0 Volume' 100
amixer -c 0 cset name='MultiMedia3 Mixer VA_CODEC_DMA_TX_0' 1
arecord -D plughw:0,2 -c 1 -d 10 -f S16_LE -r 48000 /tmp/rec.wav
```
#### **Config 1 troubleshooting**
* **No playback audio:** Verify the correct topology binary was copied for CQS or IQS, confirm the correct `plughw` device is used for the selected form factor, and re-run all mixer commands in sequence before executing `aplay`.
* **No recorded output:** Confirm the VA DMIC routing commands completed successfully, verify the correct capture device is used, and check whether `/tmp/rec.wav` is created after recording.
* **Topology not loaded:** Confirm the binary exists under `/lib/firmware/qcom/shikra/`, reboot the target, and run `echo start > /sys/class/remoteproc/remoteproc0/state` again.
### **Config 2 validation**
Config 2 uses PipeWire-based playback and record validation. The setup is common for CQS and IQS form factors.
#### **Prerequisites**
* Access to the target Shikra Config 2 device
* Shell access with permission to run `systemctl`, `chmod`, and PipeWire commands
* ADB access for pushing the playback WAV file
* Availability of the test audio file `yesterday_48KHz.wav`
#### **PipeWire setup**
Run the following commands on the target to reset PipeWire services and apply required device permissions:
```text theme={null}
echo start > /sys/class/remoteproc/remoteproc0/state
systemctl stop pipewire wireplumber pipewire-pulse
systemctl stop pipewire-manager.socket pipewire.socket pipewire-pulse.socket
chmod 777 /dev/dma_heap/qcom,audio
chmod 777 /dev/aud_pasthru_modem
systemctl start pipewire
```
#### **PipeWire node verification**
After starting PipeWire, verify that audio nodes are populated:
```text theme={null}
wpctl status
```
Relevant audio nodes should be listed in the output. Do not continue with playback or record validation until the PipeWire nodes are available.
#### **Playback validation**
Push the test file to the target and run playback:
```text theme={null}
adb push .wav /usr/
pw-play /usr/.wav
```
#### **Record validation**
```text theme={null}
pw-record /tmp/rec.wav -v
```
Verify that the recording starts successfully and `/tmp/rec.wav` is created.
#### **Config 2 quick validation summary**
| **Step** | **Command** | **Expected result** |
| :- | :- | :- |
| Stop services and sockets | `systemctl stop pipewire wireplumber pipewire-pulse` | PipeWire-related services are reset |
| Apply permissions | `chmod 777 /dev/dma_heap/qcom,audio` and `chmod 777 /dev/aud_pasthru_modem` | Required device nodes are accessible |
| Start PipeWire | `systemctl start pipewire` | PipeWire starts successfully |
| Check nodes | `wpctl status` | PipeWire nodes are populated |
| Playback test | `pw-play /usr/.wav` | Audio playback works |
| Record test | `pw-record /tmp/rec.wav -v` | Recording starts and file is created |
#### **Config 2 troubleshooting**
* **No PipeWire nodes:** Recheck service startup and device permissions.
* **Playback fails:** Confirm the WAV file exists at the expected path on the target.
* **Recording fails:** Verify the input path and inspect verbose output from `pw-record`.
## **Next steps**
* [Audio Addendum](https://dragonwingdocs.qualcomm.com/Technologies/Audio/audio-addendum-overview) — Use QACT and QXDM for calibration and diagnostics
* [Troubleshoot audio](troubleshoot-audio) — Capture and analyze audio logs to resolve issues
* [Customize audio graph](customize-audio-graph) — Modify audio graphs and PAL configuration