> ## Documentation Index
> Fetch the complete documentation index at: https://dragonwingdocs-staging.qualcomm.com/llms.txt
> Use this file to discover all available pages before exploring further.
# Flash with QSC CLI
#### Introduction
Describes how to flash images using the qsc-cli tool. Use this procedure if you are a registered user with appropriate access. It supports flashing images generated by the **qsc‑cli** build process.
#### Install required packages
`qsc-cli` is a command-line tool provided by Qualcomm that offers an end-to-end workflow
to access, manage, and build the Qualcomm software. Follow these steps to install
`qsc-cli` on your system:
* Register your Qualcomm email ID by visiting the [Qualcomm Support Page](https://www.qualcomm.com/support/working-with-qualcomm).
* Download the Debian package for `qsc-cli`:
```bash x86 theme={null}
wget https://softwarecenter.qualcomm.com/api/download/software/tools/Qualcomm_Software_Center/Linux/Debian/latest.deb -O qsc_installer.deb
```
```bash ARM64 theme={null}
wget https://softwarecenter.qualcomm.com/api/download/software/tools/Qualcomm_Software_Center/Linux/ARM64/Debian/latest.deb -O qsc_installer.deb
```
* Install the `qsc-cli` Debian package:
```bash theme={null}
sudo apt update
sudo apt install ./qsc_installer.deb
```
* Sign in to `qsc-cli` using your Qualcomm ID. For most users, your Qualcomm ID is your
email address. This opens a browser window to complete authentication. If the browser
doesn't open automatically, copy the link printed in the terminal and paste it into your
browser to complete authentication.
```bash theme={null}
qsc-cli login
```
`pcat` is a Qualcomm-provided flashing tool that offers a guided and integrated
interface to program software images onto the Qualcomm devices. Follow these
steps to install `pcat` on your system:
* Install the following tools on the host computer:
```bash theme={null}
qsc-cli tool install --name quts --activate-default-license
qsc-cli tool install --name qud --activate-default-license
qsc-cli tool install --name pcat --activate-default-license
```
If you encounter issues while installing QUD that require enrolling a public key on your Linux host, see the instructions in the README file located at `/opt/QTI/sign/signReadme.txt`.
* Confirm if the `QTI_HS-USB_QDLoader` driver is available in the installed directory:
```bash theme={null}
ls -la /dev/Q*
```
```text Sample output theme={null}
crw-rw-rw- 1 root 242 0 Dec 10 10:51 /dev/QTI_HS-USB_QDLoader_9008_3-8:1.0
```
#### Configure CDT
The configuration data table (CDT) contains device-specific information required
for proper platform initialization. You need to select the correct CDT file based
on your reference kit before flashing.
* Multiple CDT binaries are provided as part of the qcomflash tarball.
Choose the correct CDT binary for your kit and replace the default `cdt.bin`
with the appropriate one.
```bash Rb3Gen2 Core Kit theme={null}
cp cdt_core_kit.bin cdt.bin
```
```bash Rb3Gen2 Vision Kit theme={null}
cp cdt_vision_kit.bin cdt.bin
```
```bash Rb3Gen2 Industrial Kit theme={null}
cp cdt_industrial_kit.bin cdt.bin
```
```bash Rb3Gen2 Industrial Mezz Kit theme={null}
cp cdt_industrial_mezz_kit.bin cdt.bin
```
* After the entire flashing process succeeds, you can verify that the correct CDT
is loaded by reviewing the UEFI serial logs. Use the *Subtype* field to identify
the CDT loaded onto your device.
```text Sample output theme={null}
Platform Init [ 1966] BDS
Platform : IOT
Subtype : 2
Boot Device : UFS
Chip Name : QCS6490
Chip Ver : 1.0
```
| Subtype | Platform Description |
| - | - |
| 2 | Vision Kit (Moselle attach) |
| 5 | RB3Gen2 Core Kit (HSP attach) |
| 7 | Vision Kit (HSP attach) |
| 9 | Industrial Kit |
| 13 | Industrial Mezz Kit |
* Download the CDT binary from [CodeLinaro](https://artifacts.codelinaro.org/ui/native/codelinaro-le/Qualcomm_Linux/X1E80100/cdt/):
```bash theme={null}
curl -OL https://artifacts.codelinaro.org/artifactory/codelinaro-le/Qualcomm_Linux/X1E80100/cdt/IQ-X.1.4-EVK-CDT.tar.gz
```
* Extract the tarball archive:
```bash theme={null}
tar -xzf IQ-X.1.4-EVK-CDT.tar.gz
```
* Go to the extracted directory:
```bash theme={null}
cd IQ-X.1.4-EVK-CDT
```
* Flash the CDT:
```bash theme={null}
qdl --storage spinor xbl_s_devprg_ns.melf rawprogram0_BLANK_GPT.xml
qdl --storage spinor xbl_s_devprg_ns.melf rawprogram0_WIPE_PARTITIONS.xml
qdl xbl_s_devprg_ns.melf rawprogram0.xml patch0.xml
```
* Go to the previous directory:
```bash theme={null}
cd ..
```
* Download the CDT binary from [CodeLinaro](https://artifacts.codelinaro.org/ui/native/codelinaro-le/Qualcomm_Linux/CQ2390/cdt/):
```bash CQ-2390 EVK theme={null}
curl -OL https://artifacts.codelinaro.org/artifactory/codelinaro-le/Qualcomm_Linux/CQ2390/cdt/cq2390-itp.zip
```
```bash IQ-2390 EVK theme={null}
curl -OL https://artifacts.codelinaro.org/artifactory/codelinaro-le/Qualcomm_Linux/CQ2390/cdt/iq2390-itp.zip
```
* Extract the downloaded archive:
```bash theme={null}
unzip .zip
```
* Flash the CDT:
```bash theme={null}
qdl --storage emmc prog_firehose_ddr.elf rawprogram1.xml patch1.xml
```
* After CDT is flashed, the terminal displays `flashed "cdt" successfully`.
* For IQ-9075, IQ-8275, and IQ-615 kits, the default `cdt.bin` included in the
qcomflash tarball is already the correct CDT for your kit. No action is
required to select a CDT before flashing.
#### Switch device to EDL mode
The device must be in the EDL mode before you flash the software image.
The Qualcomm supported device by default enters EDL mode if there is no
image on the device after power up or if it’s corrupted. Follow these
steps to force the device into EDL mode.
* Press and hold the **F\_DL** button.
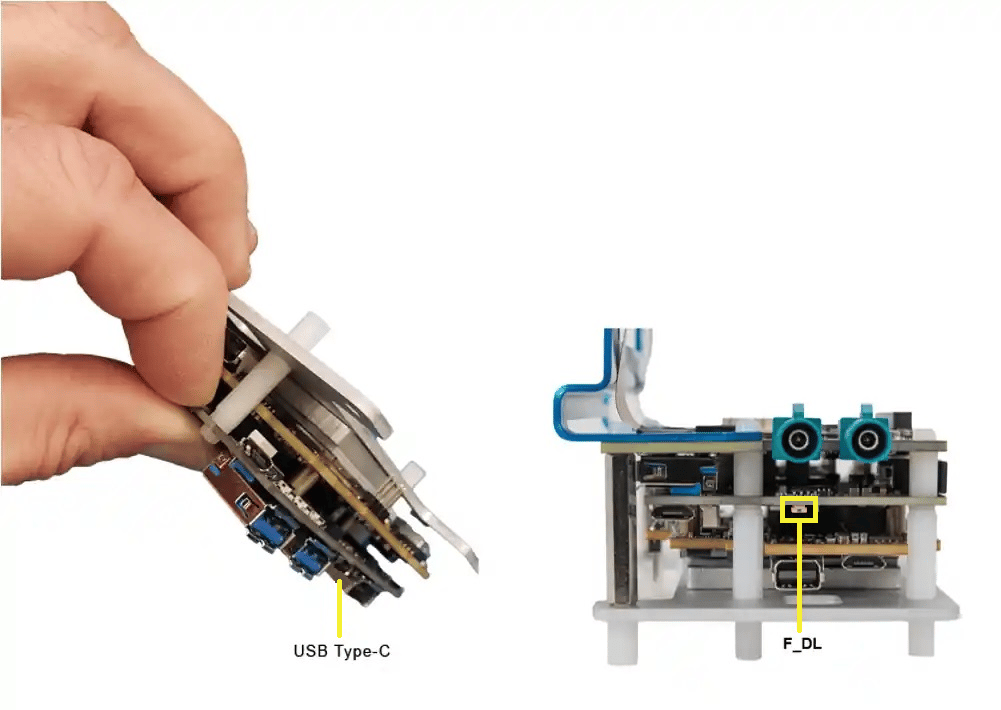 * Connect the device to a **+12 V wall power supply**.
* Connect the device to the host system through the USB Type-C connector.
* Release the **F\_DL** button. The device is now in EDL mode.
* Unplug the power cable once the entire flashing process is complete to exit EDL mode.
* Connect the device to a **+12 V wall power supply**..
* Connect the device to the host system through the USB Type-C connector.
* Put the device in EDL mode by turning on the dip switch S5-4.
* Connect the device to a **+12 V wall power supply**.
* Connect the device to the host system through the USB Type-C connector.
* Release the **F\_DL** button. The device is now in EDL mode.
* Unplug the power cable once the entire flashing process is complete to exit EDL mode.
* Connect the device to a **+12 V wall power supply**..
* Connect the device to the host system through the USB Type-C connector.
* Put the device in EDL mode by turning on the dip switch S5-4.
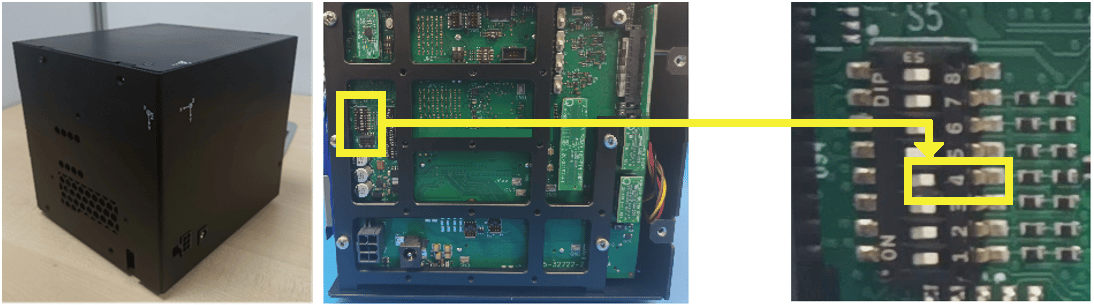 * Turn off the S5-4 dip switch after the entire flashing process is complete.
* Connect the device to a **+12 V wall power supply**.
* Connect the device to the host system through the USB Type-C connector.
* Put the device in EDL mode by turning on the dip switch SW2-3.
* Turn off the S5-4 dip switch after the entire flashing process is complete.
* Connect the device to a **+12 V wall power supply**.
* Connect the device to the host system through the USB Type-C connector.
* Put the device in EDL mode by turning on the dip switch SW2-3.
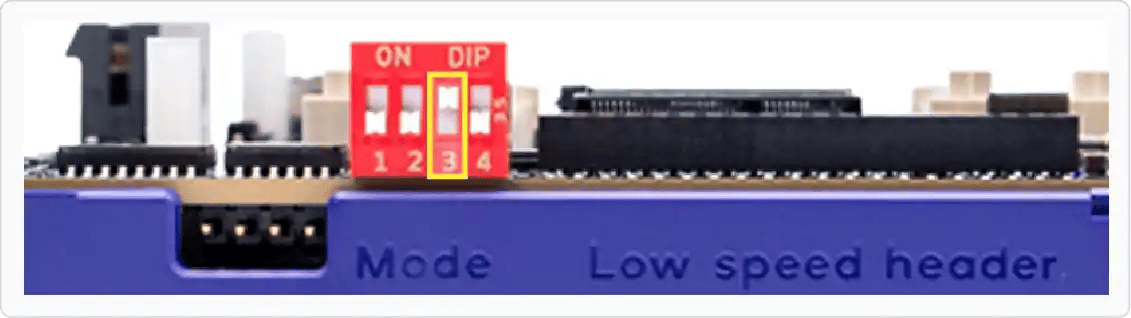 * Turn off the SW2-3 dip switch once the entire flashing process is complete.
* Connect the device to a **+12 V wall power supply**.
* Connect the device to the host system through the USB Type-C connector.
* Put the device in EDL mode by turning on the dip switch S5-4.
* Turn off the S5-4 dip switch once the entire flashing process is complete.
* Connect the device to a **+12 V wall power supply**.
* Connect the device to the host system through the USB Type-C connector.
* Put the device in EDL mode by turning on the dip switch S2-8.
* Turn off the S2-8 dip switch once the entire flashing process is complete.
* Connect the device to a **+12 V wall power supply**.
* Connect the device to the host system through the USB Type-C connector.
* Put the device in EDL mode by turning off the SW switch and turning on the dip switch SW3-4.
* Turn off the SW2-3 dip switch once the entire flashing process is complete.
* Connect the device to a **+12 V wall power supply**.
* Connect the device to the host system through the USB Type-C connector.
* Put the device in EDL mode by turning on the dip switch S5-4.
* Turn off the S5-4 dip switch once the entire flashing process is complete.
* Connect the device to a **+12 V wall power supply**.
* Connect the device to the host system through the USB Type-C connector.
* Put the device in EDL mode by turning on the dip switch S2-8.
* Turn off the S2-8 dip switch once the entire flashing process is complete.
* Connect the device to a **+12 V wall power supply**.
* Connect the device to the host system through the USB Type-C connector.
* Put the device in EDL mode by turning off the SW switch and turning on the dip switch SW3-4.
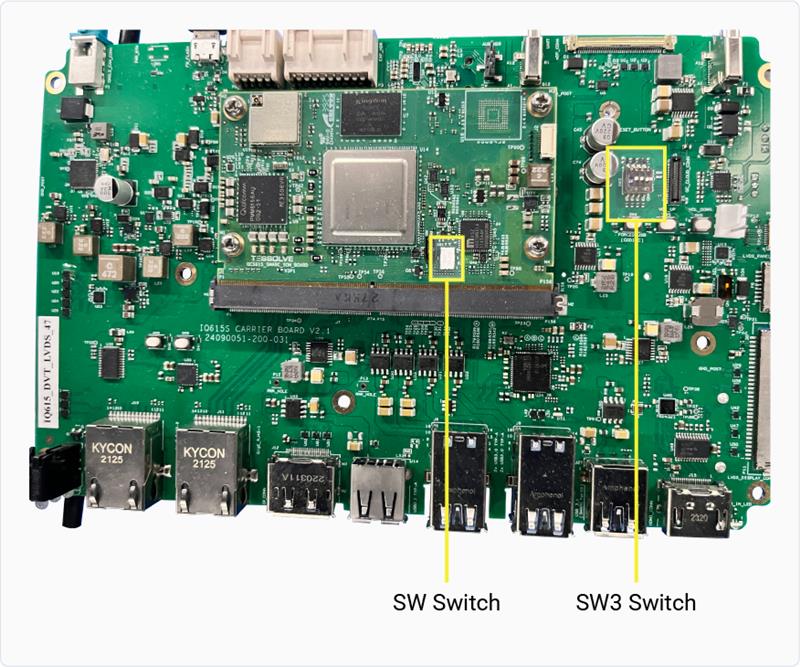 * Turn on the SW switch and turn off the SW3-4 dip switch once the entire flashing process is complete.
* Connect the device to a **+12 V wall power supply**.
* Connect the device to the host system through the USB Type-C connector.
* Put the device in EDL mode by turning on the S2-4 switch.
* Turn on the SW switch and turn off the SW3-4 dip switch once the entire flashing process is complete.
* Connect the device to a **+12 V wall power supply**.
* Connect the device to the host system through the USB Type-C connector.
* Put the device in EDL mode by turning on the S2-4 switch.
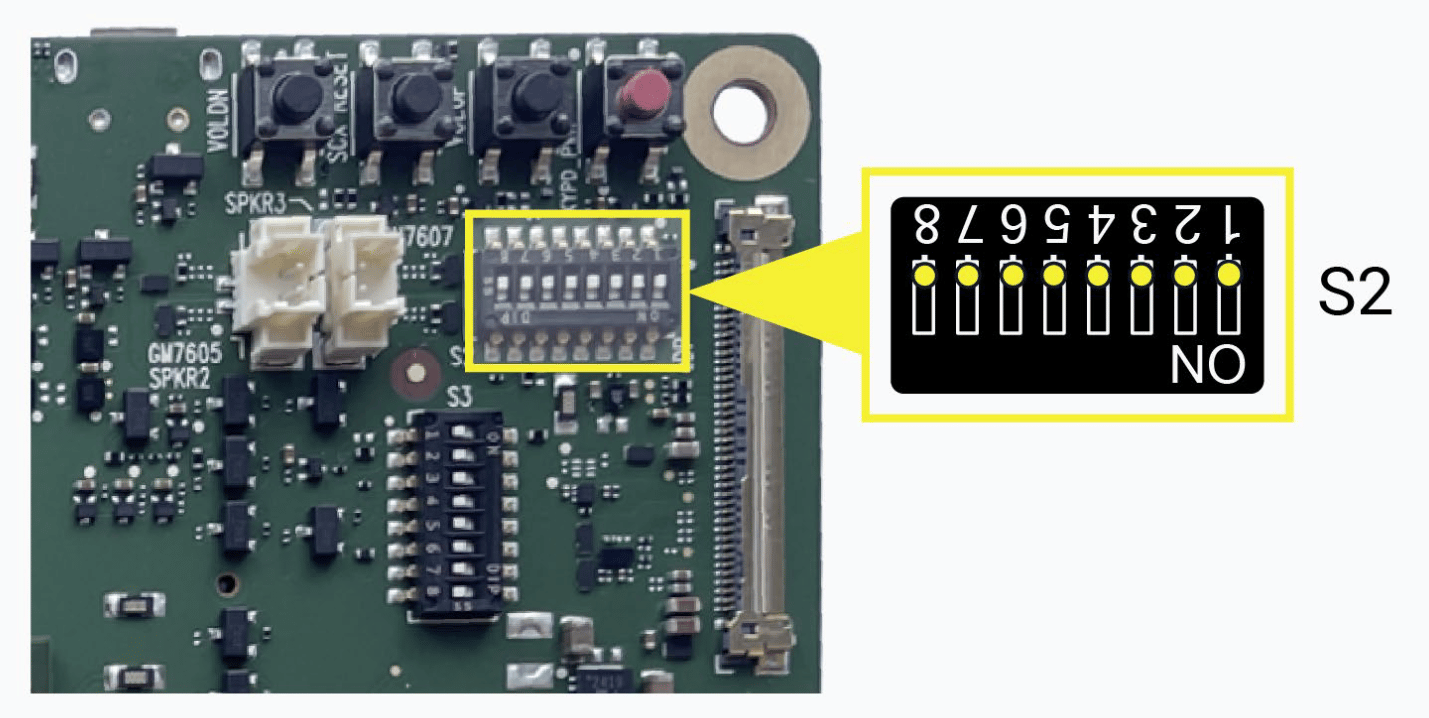 * Turn off the S2-4 dip switch once the entire flashing process is complete.
* Put the device in EDL mode by turning on the S1011-1 DIP switch.
* Turn off the S2-4 dip switch once the entire flashing process is complete.
* Put the device in EDL mode by turning on the S1011-1 DIP switch.
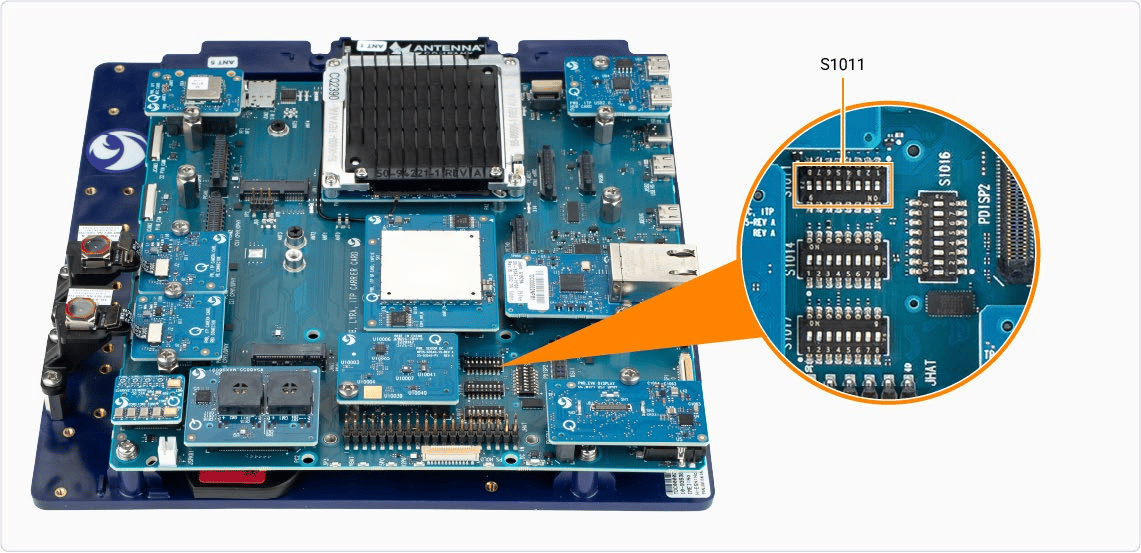 * Connect the device to a **+12 V wall power supply**.
* Connect the device to the host system through the USB Type-C connector.
* Turn off the S1011-1 DIP switch once the entire flashing process is complete.
* Put the device in EDL mode by turning on the S1011-1 DIP switch.
* Connect the device to a **+12 V wall power supply**.
* Connect the device to the host system through the USB Type-C connector.
* Turn off the S1011-1 DIP switch once the entire flashing process is complete.
* Put the device in EDL mode by turning on the S1011-1 DIP switch.
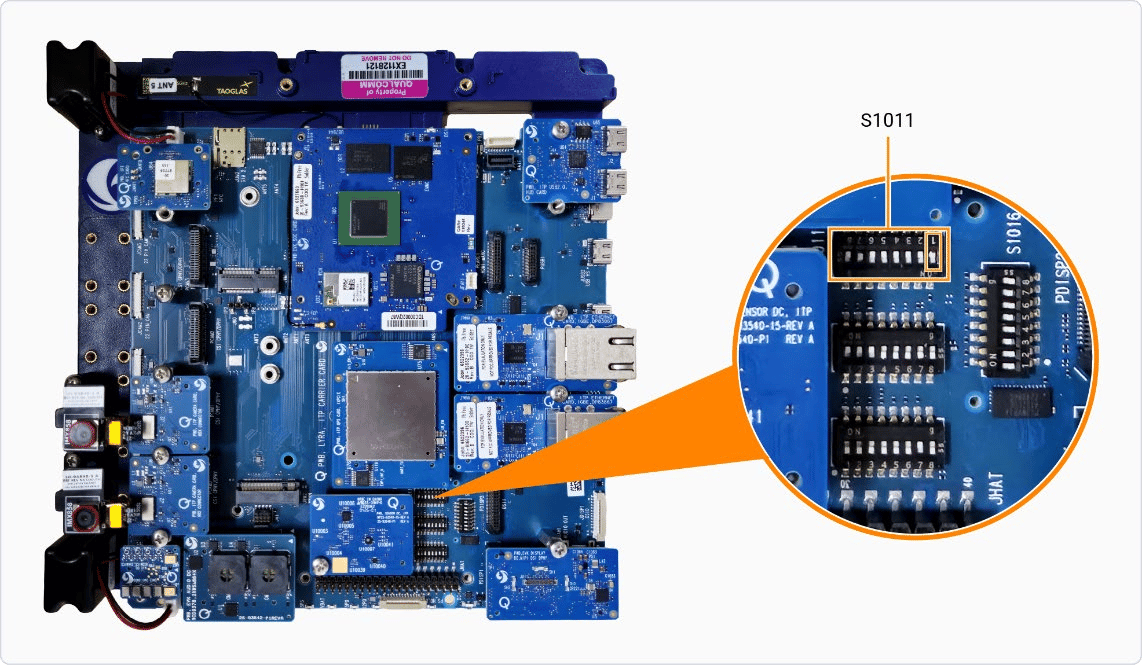 * Connect the device to a **+12 V wall power supply**.
* Connect the device to the host system through the USB Type-C connector.
* Press the **SYS\_ON** power button.
* Connect the device to a **+12 V wall power supply**.
* Connect the device to the host system through the USB Type-C connector.
* Press the **SYS\_ON** power button.
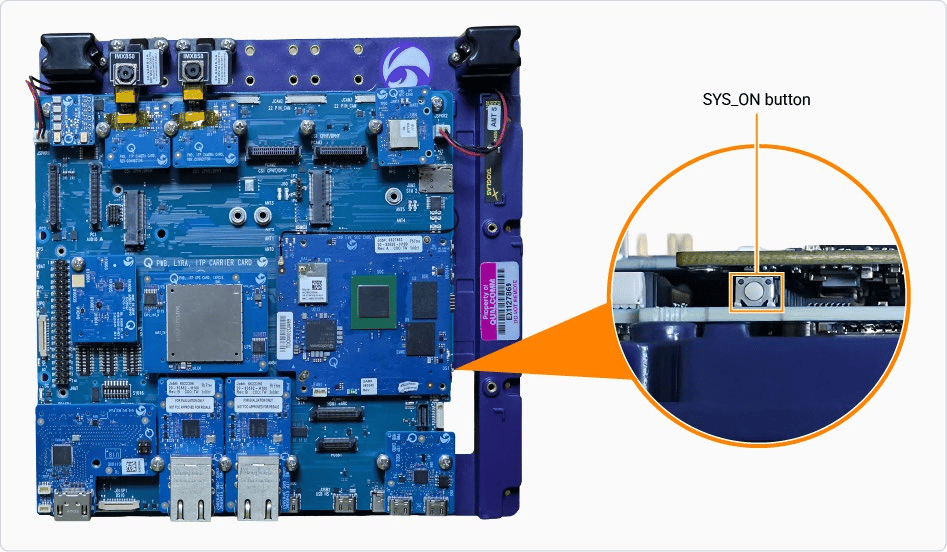 * Turn off the S1011-1 DIP switch once the entire flashing process is complete. On IQ-2390S EVK, press the **SYS\_ON** power button after turning off the DIP switch.
Verify if the device is in EDL mode by running the following command:
```bash theme={null}
lsusb
```
```text Expected output theme={null}
Bus 002 Device 014: ID 05c6:9008 Qualcomm, Inc. Gobi Wireless Modem (QDL mode)
```
#### Provision UFS
Universal flash storage (UFS) provisioning helps to divide the storage
into many LUNs, which stores different types of data separately. This
improves access efficiency and system organization.
UFS is provisioned by default on the Qualcomm hardware, so re-provisioning is required only when customizing the LUN layout. Because the Qualcomm-provided `provision.zip` will not correspond to a custom layout, you must provide your own provision files. The following commands demonstrate how to run the re-provisioning process.
UFS provisioning is not applicable for CQ-2390/IQ-2390.
* Download the provision file from Qualcomm's artifacts server:
```bash IQ-9075-EVK theme={null}
wget https://artifacts.codelinaro.org/artifactory/codelinaro-le/Qualcomm_Linux/QCS9100/provision.zip
```
```bash IQ-8275-EVK theme={null}
wget https://artifacts.codelinaro.org/artifactory/codelinaro-le/Qualcomm_Linux/QCS8300/provision.zip
```
```bash QCS6490 theme={null}
wget https://artifacts.codelinaro.org/artifactory/codelinaro-le/Qualcomm_Linux/QCS6490/provision.zip
```
```bash IQ-X7181 theme={null}
wget https://artifacts.codelinaro.org/artifactory/codelinaro-le/Qualcomm_Linux/X1E80100/provision.zip
```
```bash IQ-X5121 theme={null}
wget https://artifacts.codelinaro.org/artifactory/codelinaro-le/Qualcomm_Linux/X1E80100/provision.zip
```
* Unzip the downloaded archive:
```bash theme={null}
unzip provision.zip -d provision
```
* Go to the extracted directory:
```bash theme={null}
cd provision
```
* Provision UFS:
```bash IQ-9075-EVK theme={null}
qdl --storage ufs prog_firehose_ddr.elf provision_1_2.xml
```
```bash IQ-8275-EVK theme={null}
qdl --storage ufs prog_firehose_ddr.elf provision_1_3.xml
```
```bash QCS6490 theme={null}
qdl --storage ufs prog_firehose_ddr.elf provision_1_3.xml
```
```bash IQ-X7181 theme={null}
qdl --storage ufs xbl_s_devprg_ns.melf provision.xml
```
```bash IQ-X5121 theme={null}
qdl --storage ufs xbl_s_devprg_ns.melf provision.xml
```
* Go to the previous directory:
```bash theme={null}
cd ..
```
#### Flash SAIL
Safety Island (SAIL) image contains the isolated, safety‑critical firmware that
runs on the dedicated safety island to ensure secure boot and reliable system
operation are independent of the main processor.
Safety Island (SAIL) is applicable only for the Qualcomm Dragonwing™ IQ-9075
and the Qualcomm Dragonwing™ IQ-8275 development kits. If you’re not using one
of these development kits, skip this section.
* The SAIL artifacts are present under the `sail_nor` directory within the
unpacked qcomflash directory. Go to the following directory:
```bash theme={null}
cd sail_nor
```
* Flash the SAIL:
```bash theme={null}
qdl --storage spinor prog_firehose_ddr.elf rawprogram0.xml patch0.xml
```
* Go to the previous directory:
```bash theme={null}
cd ..
```
#### Flash a software image
* Identify the `--serialnumber` parameter for your device:
```bash theme={null}
pcat -devices
```
```text Sample output theme={null}
Searching devices in Device Manager, please wait for a moment…
ID | DEVICE TYPE | DEVICE STATE | SERIAL NUMBER | ADB SERIAL NUMBER | DESCRIPTION
NA | NA | EDL | BE116704 | be116704 | Qualcomm USB Composite Device:QUSB_BULK_CID:042F_SN:BE116704
```
* Identify the `--buildflavor` for the image to be flashed. To list the build flavors, run the following command on the host computer:
```bash theme={null}
qsc-cli chip-software flash --workspace-path "" --list-buildflavor
```
* Flash the image:
```bash theme={null}
qsc-cli chip-software flash --workspace-path "" --buildflavor "" --serialnumber ""
```
* Turn off the S1011-1 DIP switch once the entire flashing process is complete. On IQ-2390S EVK, press the **SYS\_ON** power button after turning off the DIP switch.
Verify if the device is in EDL mode by running the following command:
```bash theme={null}
lsusb
```
```text Expected output theme={null}
Bus 002 Device 014: ID 05c6:9008 Qualcomm, Inc. Gobi Wireless Modem (QDL mode)
```
#### Provision UFS
Universal flash storage (UFS) provisioning helps to divide the storage
into many LUNs, which stores different types of data separately. This
improves access efficiency and system organization.
UFS is provisioned by default on the Qualcomm hardware, so re-provisioning is required only when customizing the LUN layout. Because the Qualcomm-provided `provision.zip` will not correspond to a custom layout, you must provide your own provision files. The following commands demonstrate how to run the re-provisioning process.
UFS provisioning is not applicable for CQ-2390/IQ-2390.
* Download the provision file from Qualcomm's artifacts server:
```bash IQ-9075-EVK theme={null}
wget https://artifacts.codelinaro.org/artifactory/codelinaro-le/Qualcomm_Linux/QCS9100/provision.zip
```
```bash IQ-8275-EVK theme={null}
wget https://artifacts.codelinaro.org/artifactory/codelinaro-le/Qualcomm_Linux/QCS8300/provision.zip
```
```bash QCS6490 theme={null}
wget https://artifacts.codelinaro.org/artifactory/codelinaro-le/Qualcomm_Linux/QCS6490/provision.zip
```
```bash IQ-X7181 theme={null}
wget https://artifacts.codelinaro.org/artifactory/codelinaro-le/Qualcomm_Linux/X1E80100/provision.zip
```
```bash IQ-X5121 theme={null}
wget https://artifacts.codelinaro.org/artifactory/codelinaro-le/Qualcomm_Linux/X1E80100/provision.zip
```
* Unzip the downloaded archive:
```bash theme={null}
unzip provision.zip -d provision
```
* Go to the extracted directory:
```bash theme={null}
cd provision
```
* Provision UFS:
```bash IQ-9075-EVK theme={null}
qdl --storage ufs prog_firehose_ddr.elf provision_1_2.xml
```
```bash IQ-8275-EVK theme={null}
qdl --storage ufs prog_firehose_ddr.elf provision_1_3.xml
```
```bash QCS6490 theme={null}
qdl --storage ufs prog_firehose_ddr.elf provision_1_3.xml
```
```bash IQ-X7181 theme={null}
qdl --storage ufs xbl_s_devprg_ns.melf provision.xml
```
```bash IQ-X5121 theme={null}
qdl --storage ufs xbl_s_devprg_ns.melf provision.xml
```
* Go to the previous directory:
```bash theme={null}
cd ..
```
#### Flash SAIL
Safety Island (SAIL) image contains the isolated, safety‑critical firmware that
runs on the dedicated safety island to ensure secure boot and reliable system
operation are independent of the main processor.
Safety Island (SAIL) is applicable only for the Qualcomm Dragonwing™ IQ-9075
and the Qualcomm Dragonwing™ IQ-8275 development kits. If you’re not using one
of these development kits, skip this section.
* The SAIL artifacts are present under the `sail_nor` directory within the
unpacked qcomflash directory. Go to the following directory:
```bash theme={null}
cd sail_nor
```
* Flash the SAIL:
```bash theme={null}
qdl --storage spinor prog_firehose_ddr.elf rawprogram0.xml patch0.xml
```
* Go to the previous directory:
```bash theme={null}
cd ..
```
#### Flash a software image
* Identify the `--serialnumber` parameter for your device:
```bash theme={null}
pcat -devices
```
```text Sample output theme={null}
Searching devices in Device Manager, please wait for a moment…
ID | DEVICE TYPE | DEVICE STATE | SERIAL NUMBER | ADB SERIAL NUMBER | DESCRIPTION
NA | NA | EDL | BE116704 | be116704 | Qualcomm USB Composite Device:QUSB_BULK_CID:042F_SN:BE116704
```
* Identify the `--buildflavor` for the image to be flashed. To list the build flavors, run the following command on the host computer:
```bash theme={null}
qsc-cli chip-software flash --workspace-path "" --list-buildflavor
```
* Flash the image:
```bash theme={null}
qsc-cli chip-software flash --workspace-path "" --buildflavor "" --serialnumber ""
```